S T R A N D 1
MARTIN KLIMAS
ABOUT
|
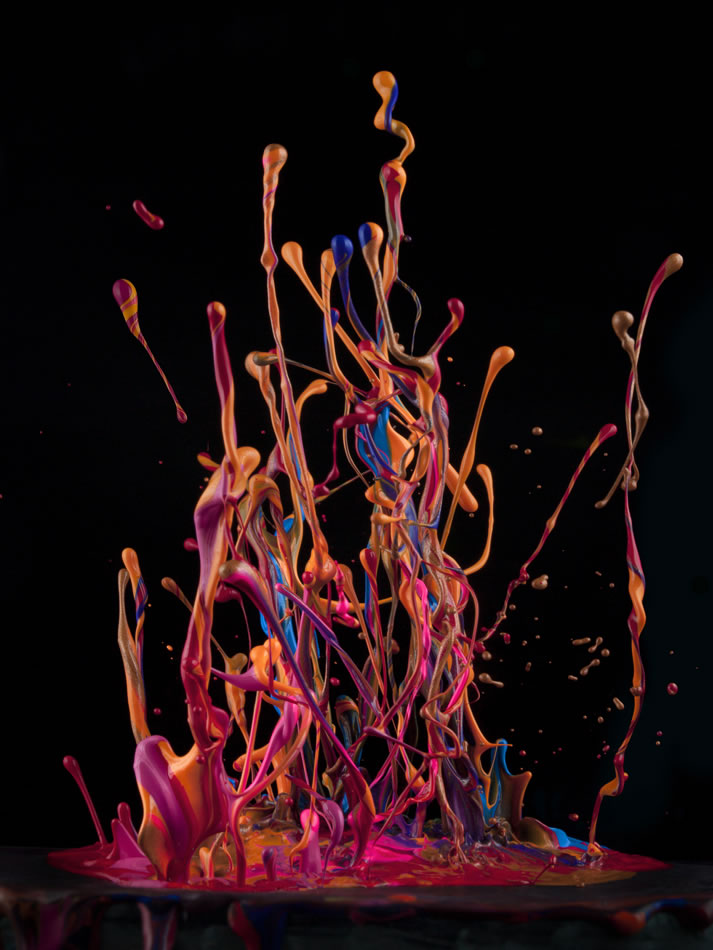
Martin Klimas is a German photographer who is much known for his high speed photography, capturing masterpieces that are missed by the human eye. His project, sound sculptures, enables the viewer to see and understand the impact that sound waves have on liquids such as paint. To perform the shoot Klimas placed a stretched canvas over a very large speaker and then splashed different colours of paint onto the canvas.
Following this, he would then turn the speaker onto full volume and then watch as the vibrations start to build and throw the paint upwards, in all sorts of shapes and sizes. Whilst doing this he would photograph the results. The fascinating thing is that each individual photograph is different from the rest and is different because of the song choice. The difference in song obviously means that the paint raptures in dissimilar ways and thus creates unique photographs. |

|
|

|

ANALYSIS
The fascinating thing is that each individual photograph is different from the rest and is different because of the song choice. The difference in a song obviously means that they paint raptures in dissimilar ways and thus create unique photographs. This conveys the idea that different sounds create different visual representations highlighting the change in motion of the particles depending on their manipulation.
PERSONAL RESPONSE
PHOTO SHOOT
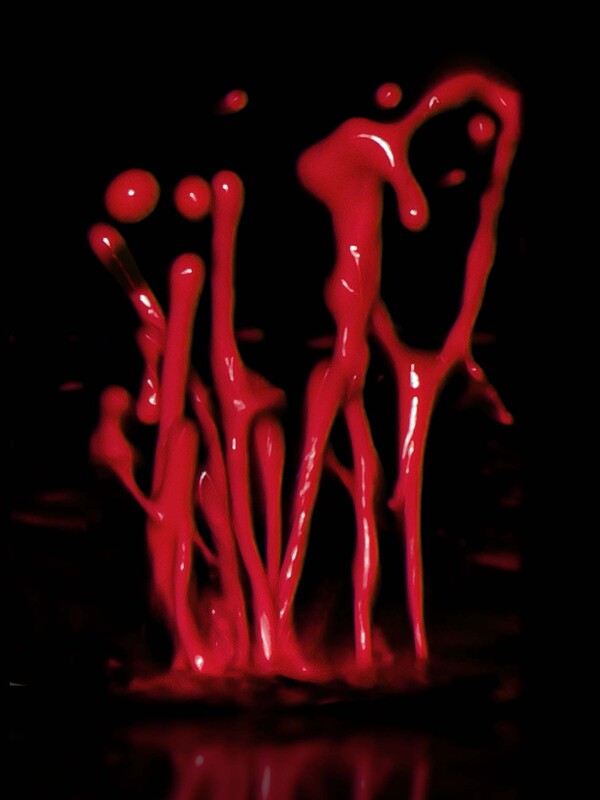
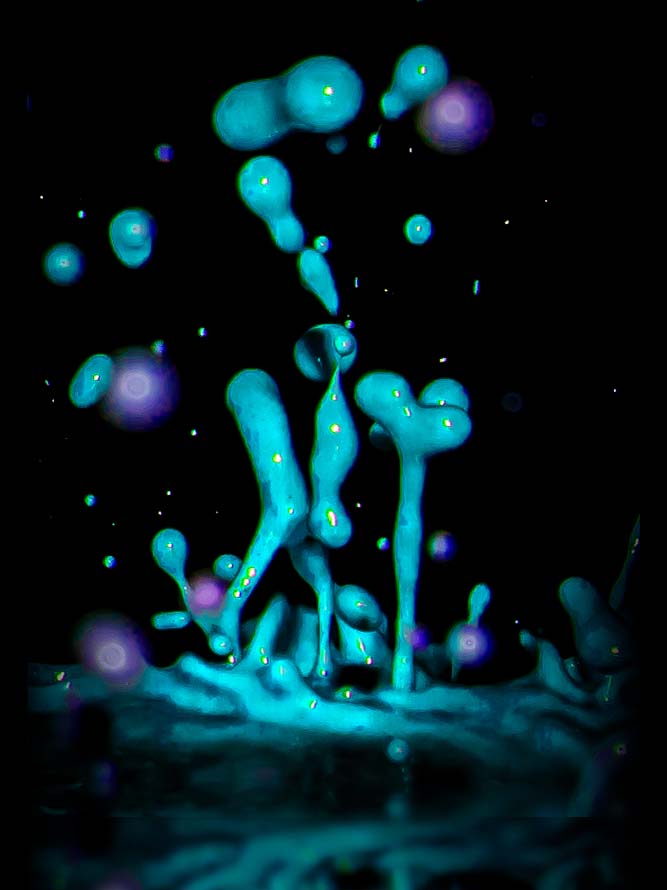
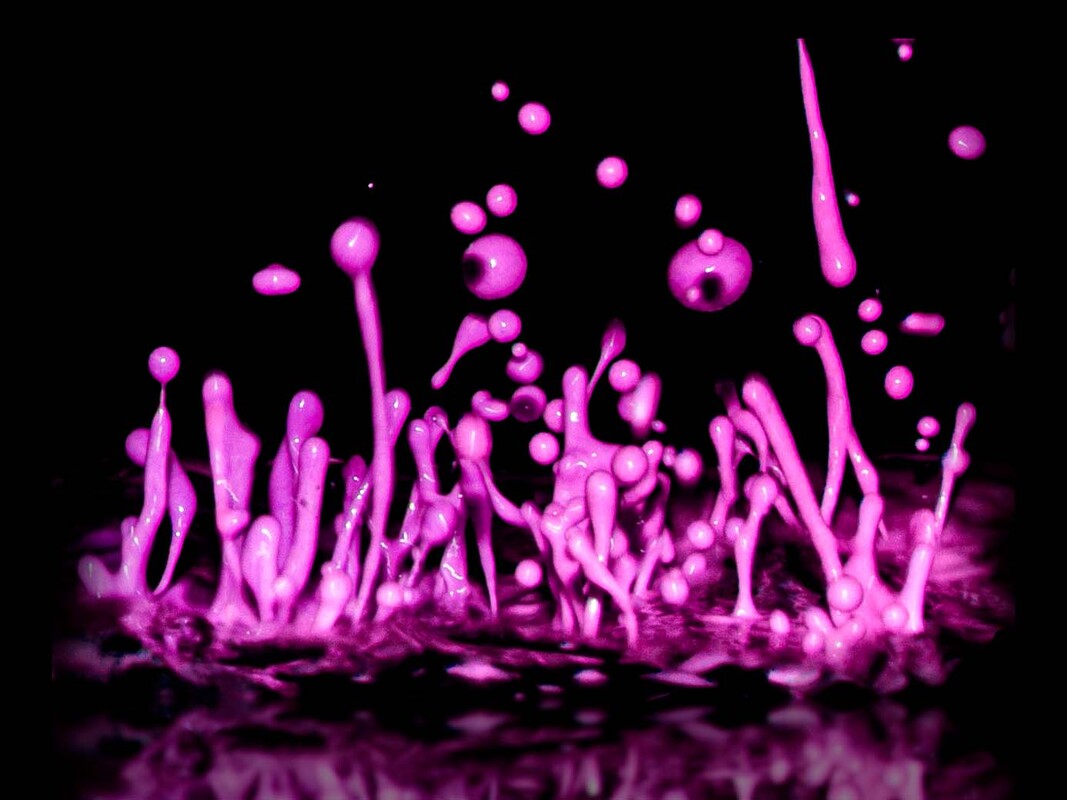
I began by setting up a speaker wrapped in plastic and applied a number of different coloured paints in a number of different concoctions. I then played a loud banging sound at 85 hertz to gain the largest vibrations possible.
To take the photographs I used a singular flash from a front-on angle, I used a shutter speed of 250 to gain a sharp image with minimal blur.
To take the photographs I used a singular flash from a front-on angle, I used a shutter speed of 250 to gain a sharp image with minimal blur.
EDITS
Inside Camera RAW, I began by cropping my images into a selection of the frame with an interesting composition. I increased the exposure slightly as well as crunching the highlights and shadows to gain a high-contrast image with a pure black background. I then increased the texture and sharpening values to enhance the effect that the paint had been frozen in time giving a more realistic defined look.
I then opened my images in a photoshop canvas, duplicated them, flipped them vertically and decreased the opacity to emulate this idea of a reflection at the bottom of the frame. Finally, I alter the hues of the paint with the hue & saturation adjustment layer creating a more vibrant image.
I then opened my images in a photoshop canvas, duplicated them, flipped them vertically and decreased the opacity to emulate this idea of a reflection at the bottom of the frame. Finally, I alter the hues of the paint with the hue & saturation adjustment layer creating a more vibrant image.

|
|
EVALUATION
WWW
Paint created interesting and unique compositions highlighting the idea of change in motion behind Klimas's work. In addition, the high shutter speed and flash captured the paint in motion with little to no blur.
EBI
Paint vibrated more creating larger and higher displacements matching Kilmas's photographs better. In companion, the hues and colourisation were less pixilated and patchy creating a more pleasing image. Finally, photographs contained less grain and paint was sharper within the frame.
S T R A N D 2
BRENDON KIDWELL
ABOUT
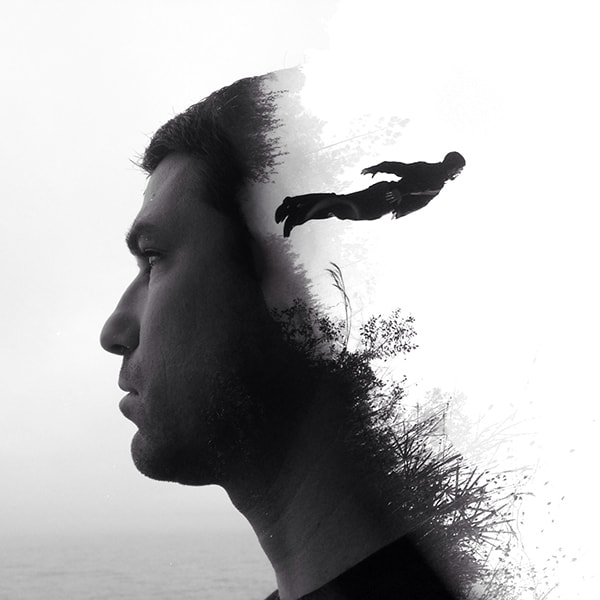
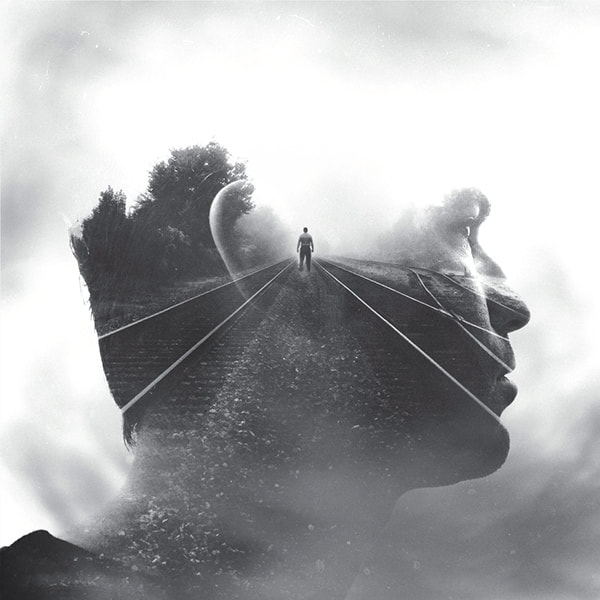
Brandon Kidwell is a self taught photographer from Florida. His work is a result of his surroundings, the people in his life and applied interpretations of states of being connecting images with concepts to tell his stories. He has been included in various gallery exhibits around the globe and placed first in the Lifestyle category of the iPhone Photography Awards in 2014.
|
|

ANALYSIS
Kidwell uses different body parts of his subjects to frame his double exposure images. He implements a rough texturised style with a number of grunge overlays bleeding into the frame, his photographs experiment with a number of different environments emoting the viewer in an array of different fashions. The deep connotations his photographs hold, possibly mirroring the the inner side of human nature and creativity.
PERSONAL RESPONSE
PHOTO SHOOT
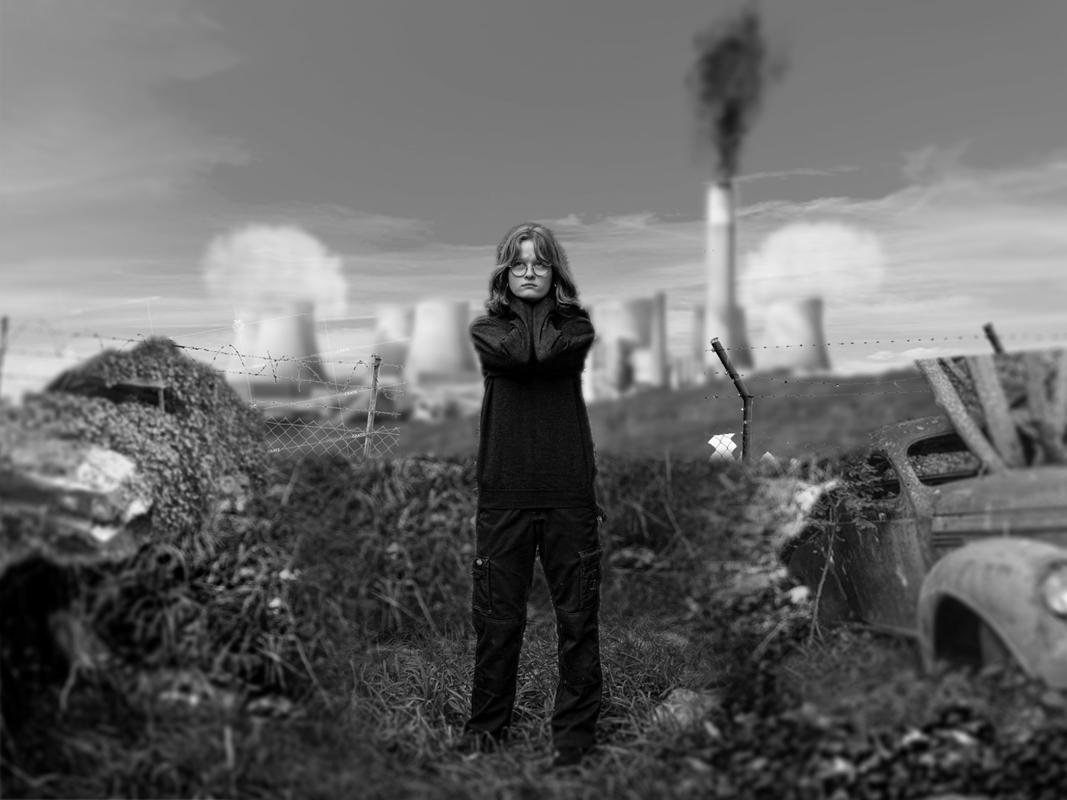
For my response, I want to use the visual concept of Kidwell's images but implement modern political issues into the content of the frame. I want to mirror the change in the current climate and highlight the damage we are causing to our planet. I want to viewer to emoted similar to that of Kidwell's work but instead think about the different themes present in the image.
For my primary model photographs, I used a white backdrop for ease of masking out my subject later when editing. I used directional lighting to cast a shadow onto the opposite side of their face in order to create a feathering point for my double exposure images when using blend modes.
I then photographed my model in a grungy, overgrown environment to represent an almost post apocalyptic environment.
EDITS
In Photoshop, I began by increasing the contrast of my photographs and darkening the shadows. I then went about creating a digital layered landscape using a mix of my photograph and digital elements such as cars, fences, and factories. I used a number of blend modes, perspective tools and blurs to create a realistic image.
I then brought my close-up model image into a new document and masked out my subject using the object election tool. I overlayed my digital image and blended them using a clipping mask in addition to feathering the masks heavily. For the final touches I used a number of smoke a dirt overlays to add to the style of the image creating a grungier image.
I then brought my close-up model image into a new document and masked out my subject using the object election tool. I overlayed my digital image and blended them using a clipping mask in addition to feathering the masks heavily. For the final touches I used a number of smoke a dirt overlays to add to the style of the image creating a grungier image.
|

|

S T R A N D 3
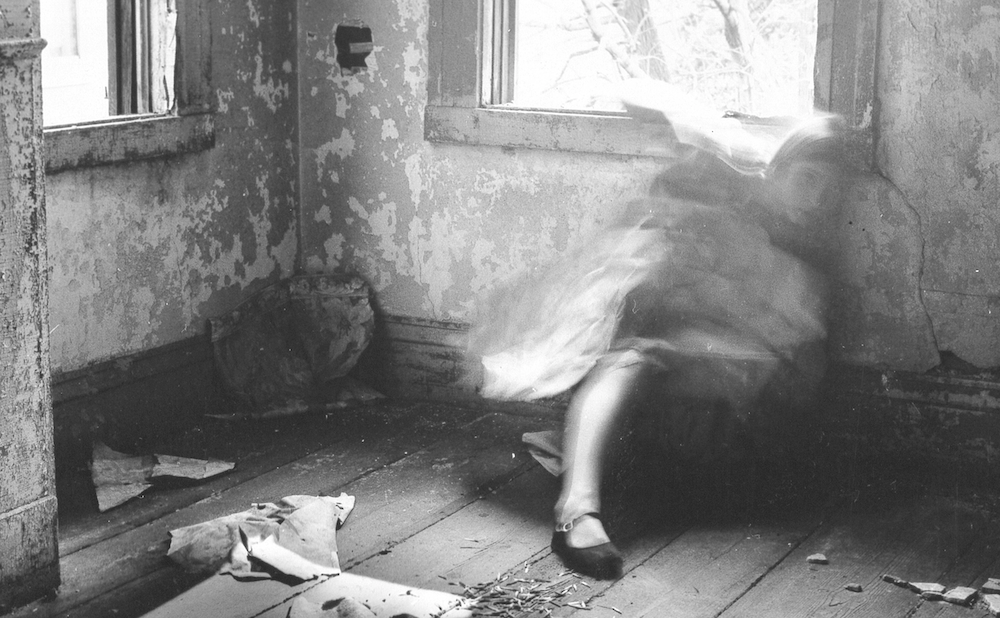
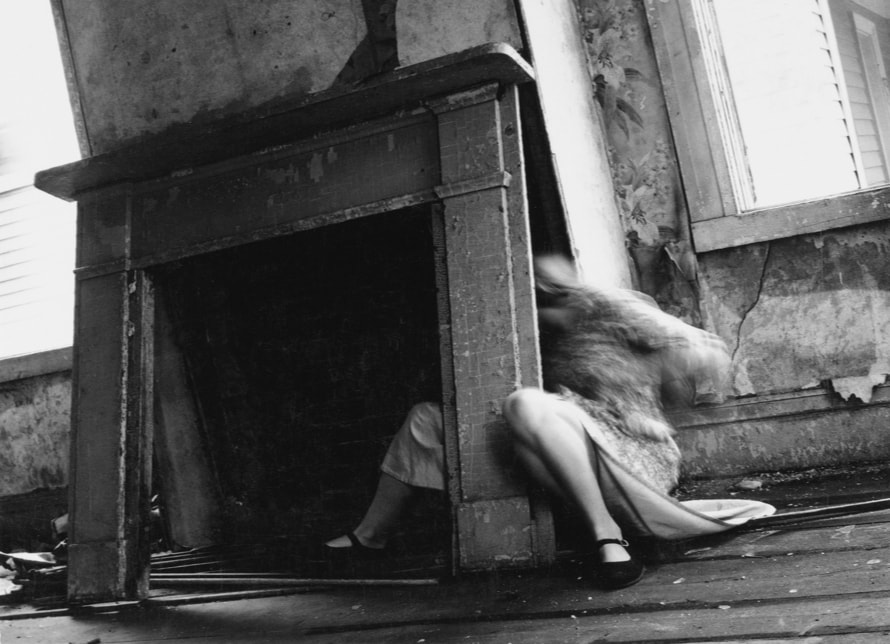
FRANCESCA WOODMAN
ABOUT
Prodigious talent Francesca Woodman (1958–1981) took her first mature photograph at the age of thirteen and went on to produce a body of work that has received critical recognition in the years since her passing. She was raised primarily in Italy and was born in Boulder, Colorado, into an artistic family.
|
|
ANALYSIS
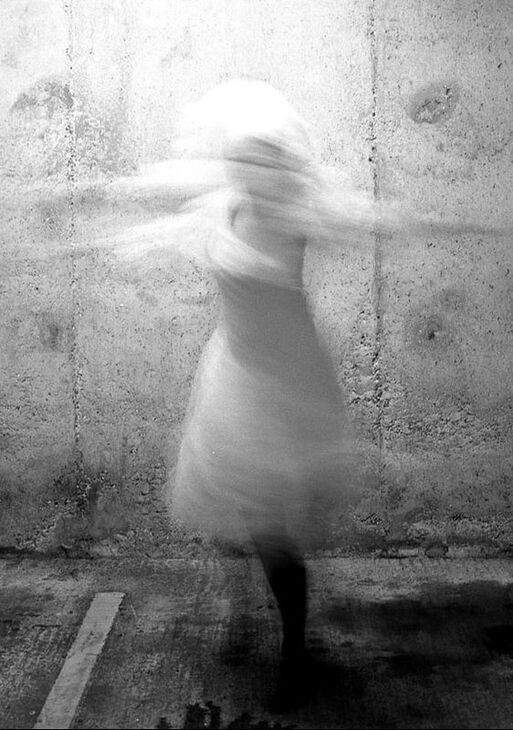
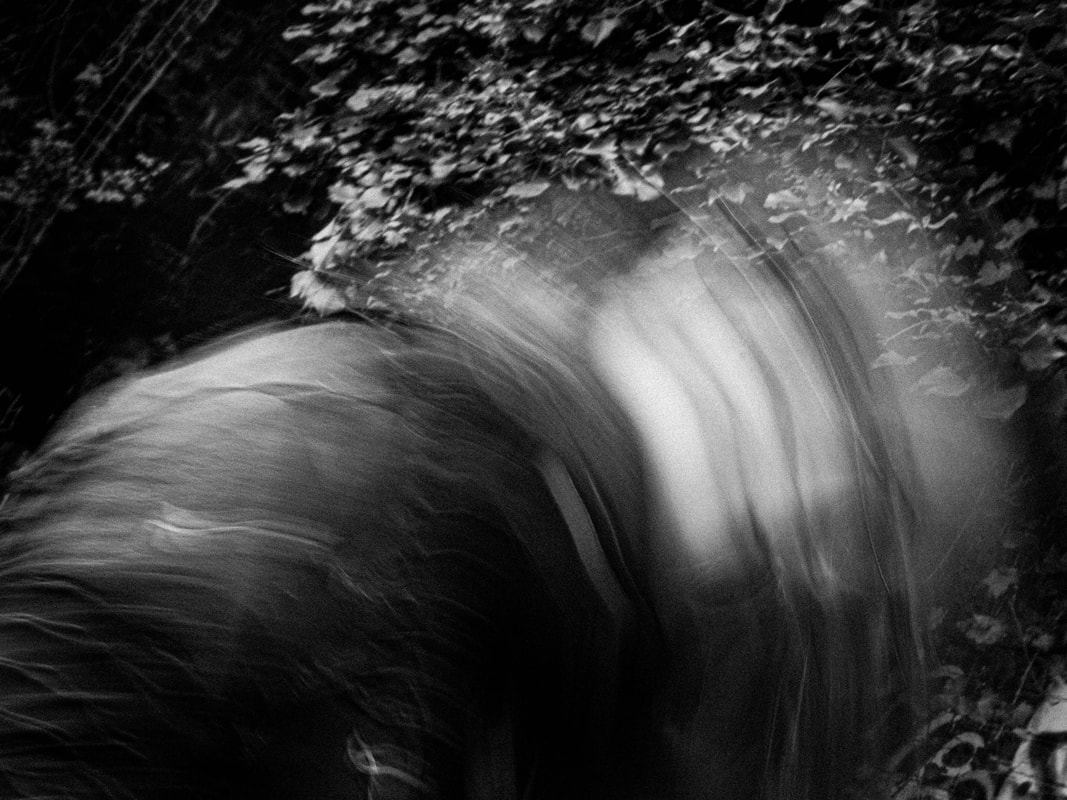
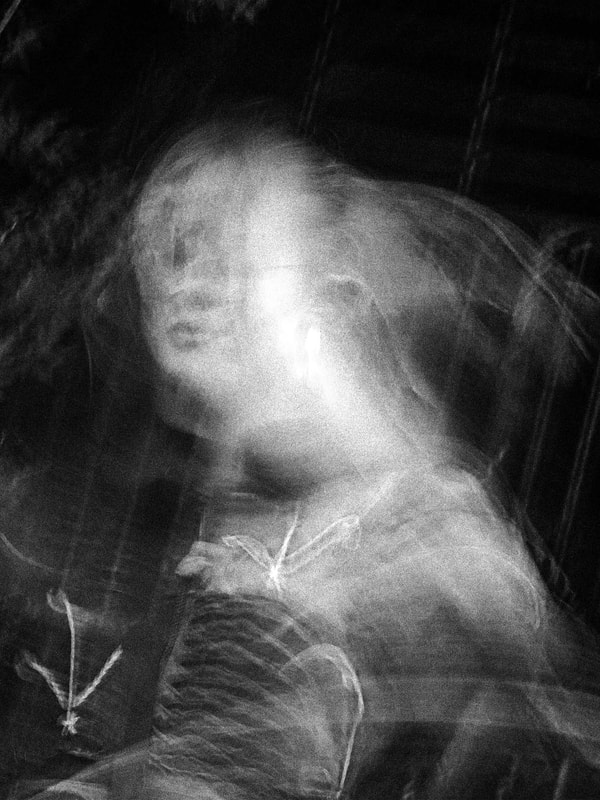
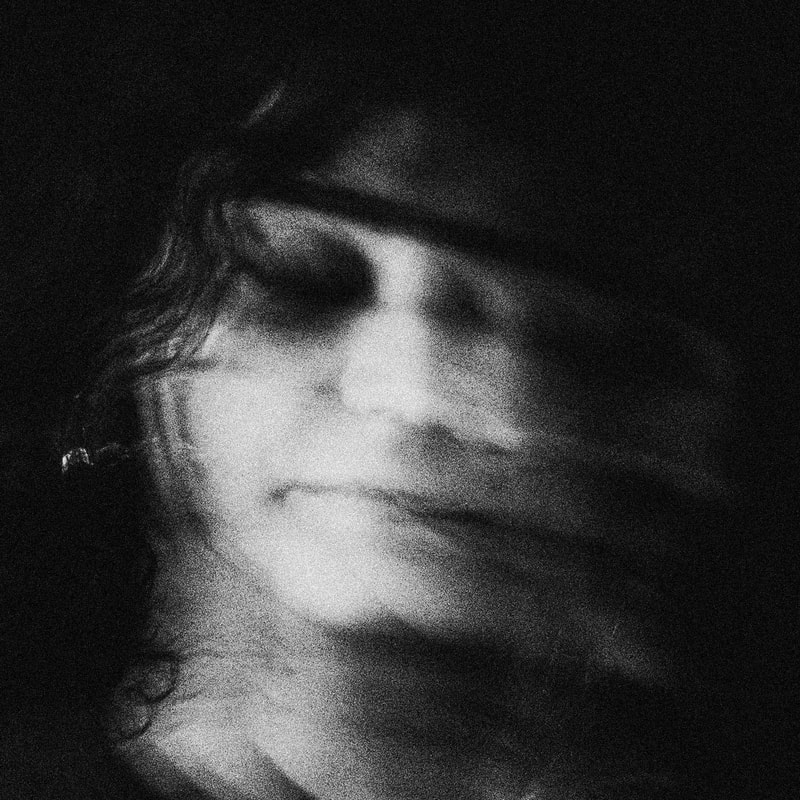
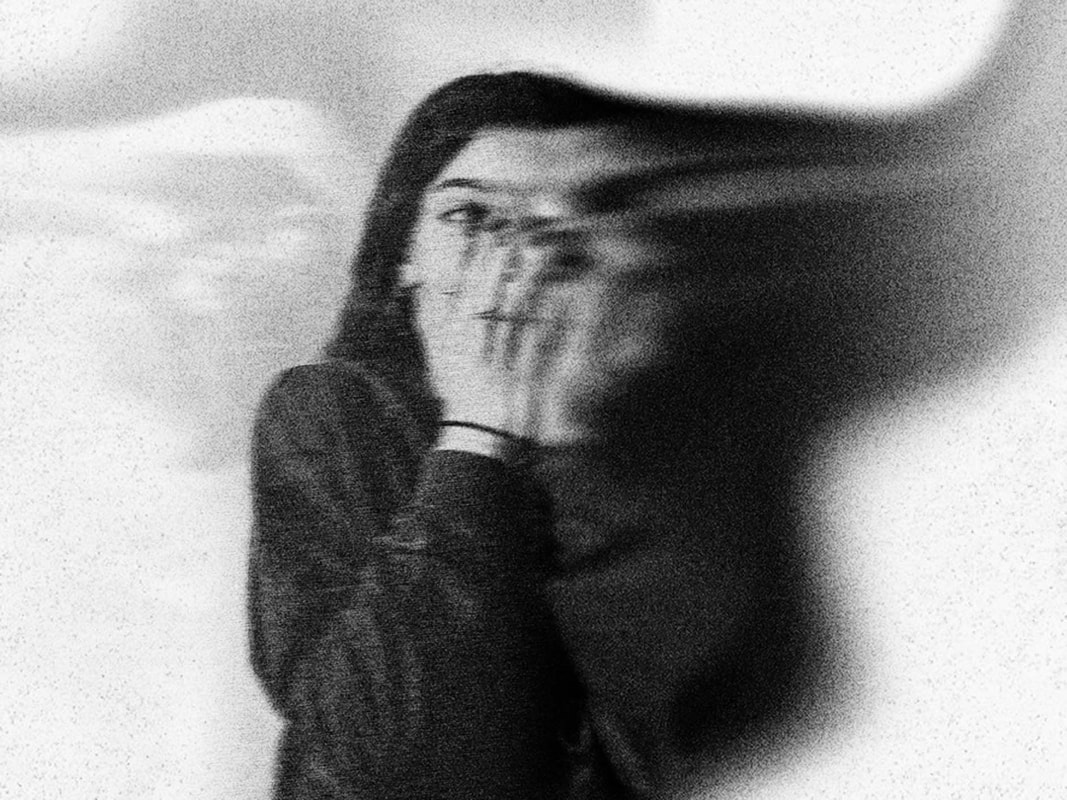
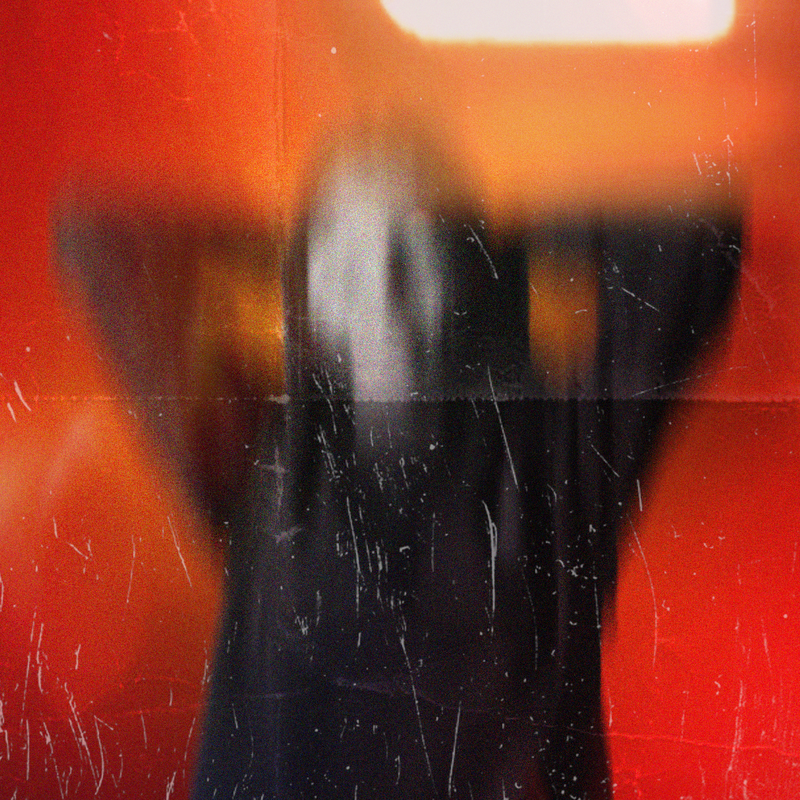
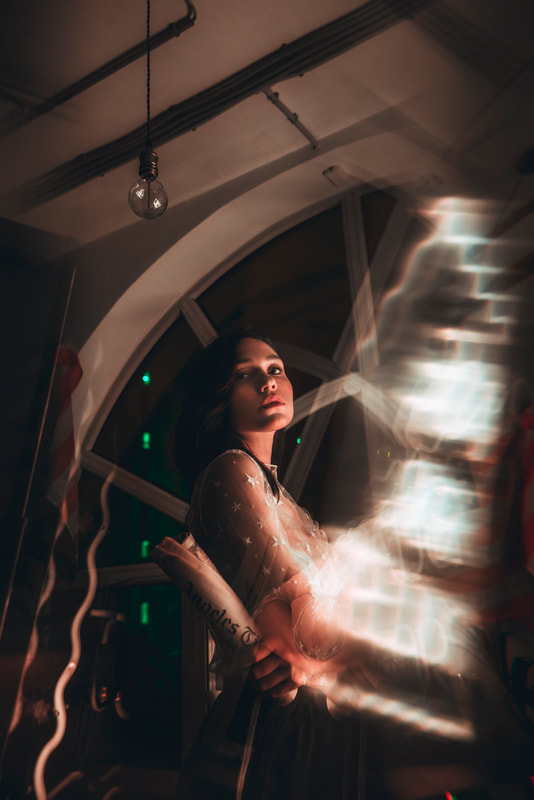
Francesca Woodman uses a low shutter speed within her photographs to create abstract shapes and compositions highlighting the change of movement within a person potentially metaphorically representing her inner expression as a physical representation. Her unique and gothic style of artwork is captured through the eerie and rigid locations as well as her absurd abstract positioning within the frame.
PERSONAL RESPONSE
PHOTO SHOOT
When photographing I chose a location that I thought reflected but also built upon the style of Woodman. For my camera settings, I reduced my shutter speed from between 0.5-2 to get a range of different blurs within the frame. I also increased my aperture to about 20 and reduced my ISO to 200 as it was a bright day and wanted to retain the information in my highlights for further control and flexibility when editing.
I tried to use a number of unique and abstract angles to further match Woodman’s through process allowing my model to chose the movements and positioning they thought expressed them best.
I used a monopod to stabilise my camera enough to reduce background blur and distortion however keep flexibility within movement so if I wanted to change positions or angles I could do rapidly.
EDITS
When editing, I brought all my photographs into Camera RAW and decreased the exposure values and increased the contrast through crushing the shadows and increasing the highlights - same for whites and blacks. I then increased the texture, detail, and clarity to gain a more rigid detailed image building this vintage style. I added an additional grain as well as a subtle vignette.
Then I brought select photographs back into photoshop and used a number of blurs from tilt shifts (to add depth - counteracting my high aperture) radial blurs (for an abstract affect) highlighting and drawing viewers attention to specific parts of the frame. I finally composited a number of smoke assets to enhance the subjects movement as well as build the atmosphere.
Then I brought select photographs back into photoshop and used a number of blurs from tilt shifts (to add depth - counteracting my high aperture) radial blurs (for an abstract affect) highlighting and drawing viewers attention to specific parts of the frame. I finally composited a number of smoke assets to enhance the subjects movement as well as build the atmosphere.
|
|
|
|
For this particular image, (using a flash) I started my shutter while my zoom lens was set to 100mm and then quickly racked it down to 18mm allowing for this abstract effect where the background it bleeding into the figure of my model creating this intriguing composition.
EVALUATION
WWW
The low shutter speed effectively blurred and created a dynamic composition similar to Woodman's style. The wide range of angles and subject positions highlight the idea of change - not only change in movement but change in thought and expression. The subjects wide range of expressions also reflect this. The use of additional blurs and smoke overlays enhanced these themes creating a visually interesting image.
EBI
More practical props were introduced to fit with Francesca's style further - such as mirrors etc.
D E V E L O P M E N T 1
NADAV KANDER
ABOUT
Nadav Kander is a London based photographer, artist and director, internationally renowned for his portraiture and landscapes. His work forms part of the public collection at the National Portrait Gallery and the Victoria and Albert Museum in London.

|

|

ANALYSIS
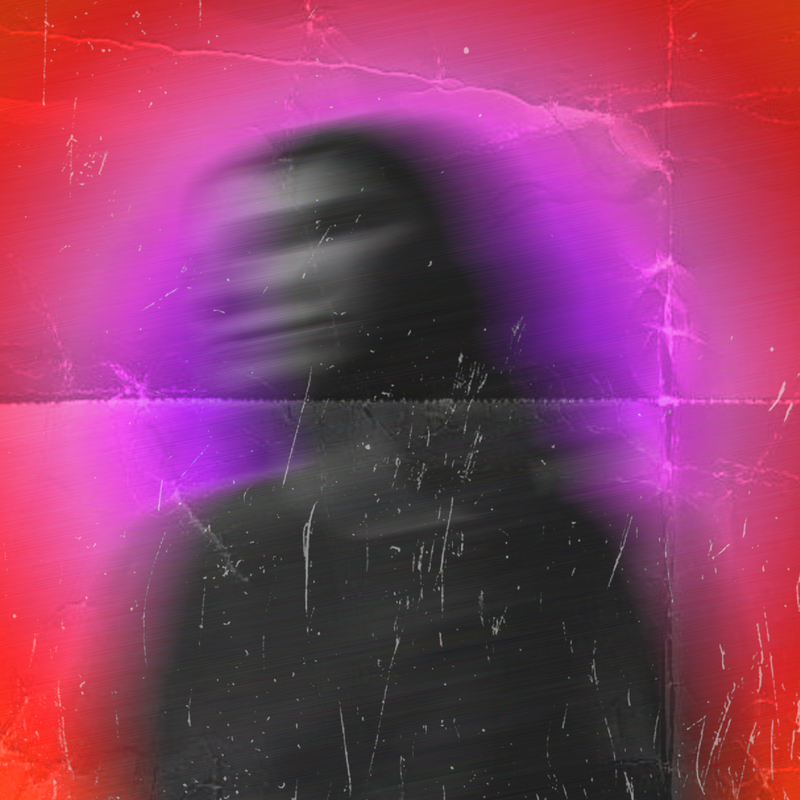
In these particular works of Kander, he intricately captures the destruction and decay of the environment around the Chernobyl nuclear incident that took place in 1986. The photographs were captured in 2004 and highlight the abandoned and overgrown rooms and areas. I find these locations very interesting as I believe they mirror the almost blurred mental state of change that my low shutter developments have illustrated so far.
PERSONAL RESPONSE
PHOTO SHOOT
I decided to shoot at an abandoned location to match Kander's style. I used a monochrome picture profile to remain with my timeless grunge feel of my previous developments. This time around I attempted to position my subject in multiple positions for multiple photographs from the same angle in order to experiment with blending these together later in the editing process.
For most of my images I used an f-stop of 4.5 to gain a shallow depth of field, paired with a shutter speed of about 120, and seeming as it was a bright day an ISO of 200.
For particular images I changed my camera to aperture priority mode (Av) to allow me to quickly get some low shutter speed shots, as in particular locations it was somewhat dark automatically reducing the shutter by a large margin to gain a properly exposed image, saving time. This in companion to having my subject partake in a number of movements allowed me to achieve a number of blurred photographs. I later experimented with foreground elements such as feathers to produce a chaotic and unusual atmosphere adding an extra layer to the frame to create further depth.
For the Silhouette shots I underexposed m subject making sure to keep the highlights within an acceptable exposure in order to pull that information back later in camera RAW when editing if needed.
EDITS
In camera RAW, for all my images I boosted their texture and clarity values in addition to slightly raising the de-hase levels to gain a sharp contrast packed image. I also darkened the shadows and ramped up the highlights by drawing an s-curve using the curves adjustment for additional contrast.
I then opened my images in a photoshop document, I experimented by overlaying different images using a number of blend modes from multiply, screen, exclusion, and colour dodge all giving me a range of unique looks and feels. I created a number of masks around particular parts of different frames I enjoyed, boosted the feathering and built a number of different compositions. I tried to illustrate 'mental change' and the multiple different emotions that a person can feel all at once.
For the finishing touches I added additional grain overlays set to the soft light blend mode with an opacity of about 80%. I also added a vignette around the outside of the frame to enhance that grunge look as well as draw the viewers attention to primary focal point of the frame.
|
|
EVALUATION
WWW
The abandoned location worked well with the style of photography and worked hand in hand to build a chaotic atmosphere. The use of blend modes and overlaying multiple photographs demonstrated the interesting duplicity of thought and highlighted the themes behind my work so far.
EBI
Overlays and opacity changes made subjects expressions difficult to view or understand reducing the expressional change that the viewer experienced.
D E V E L O P M E N T 2
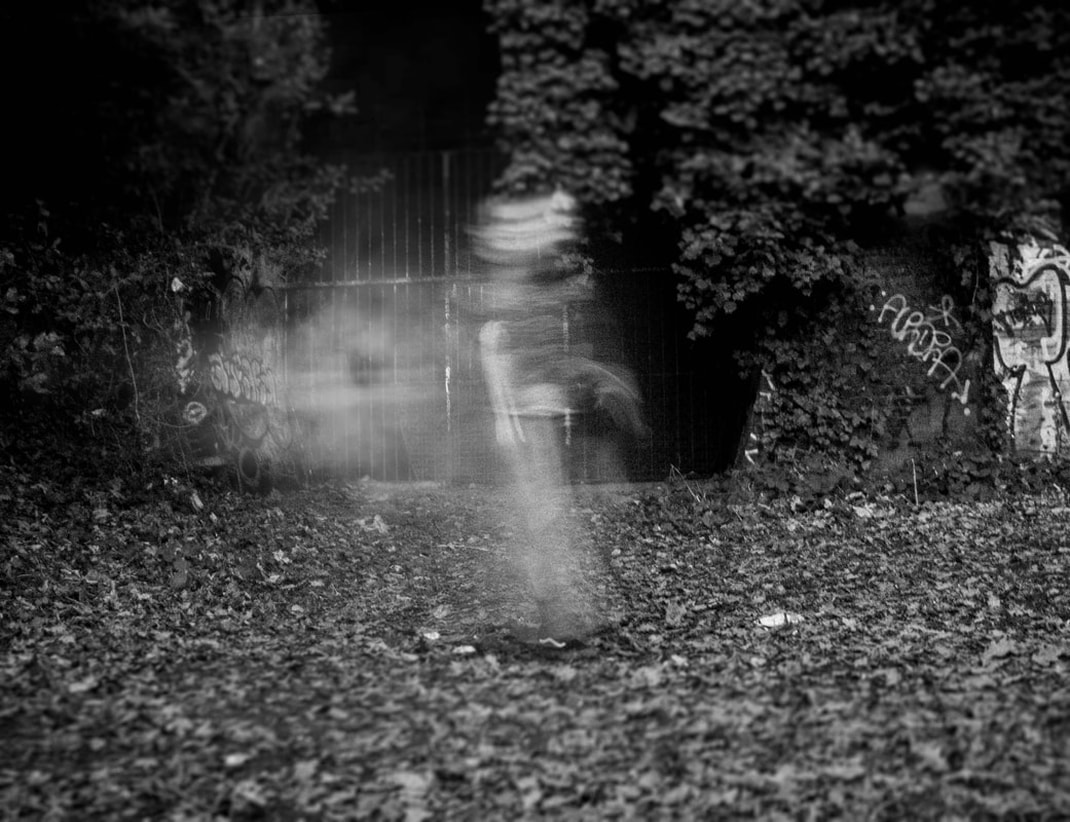
EDUARDO ASENJO
ABOUT
Eduardo Asenjo Matus, was born in Valdivia Chile on October 5, 1990. Street photographer, former student of Architecture and Graphic Design, Fujifilm-X Chile and Tripodes.cl ambassador. The Photography love began in 2008, then I studied photography independently.

|
|

ANALYSIS
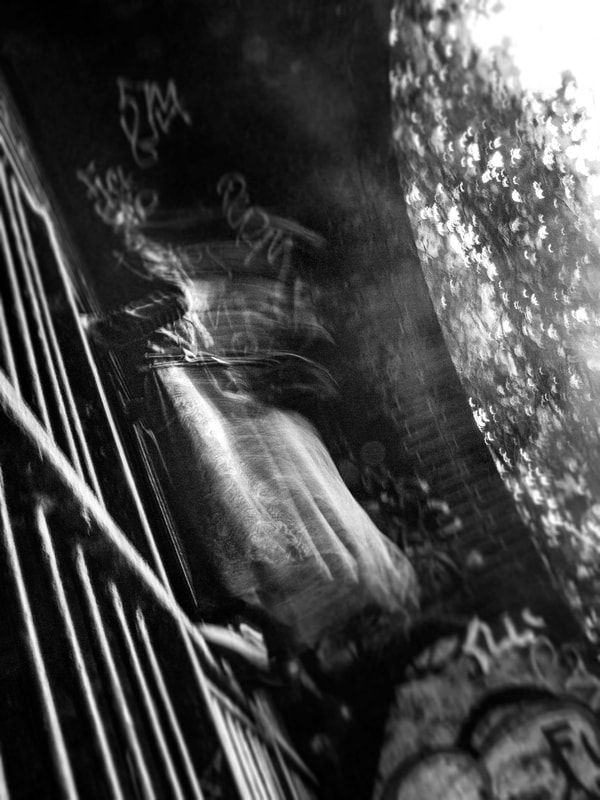
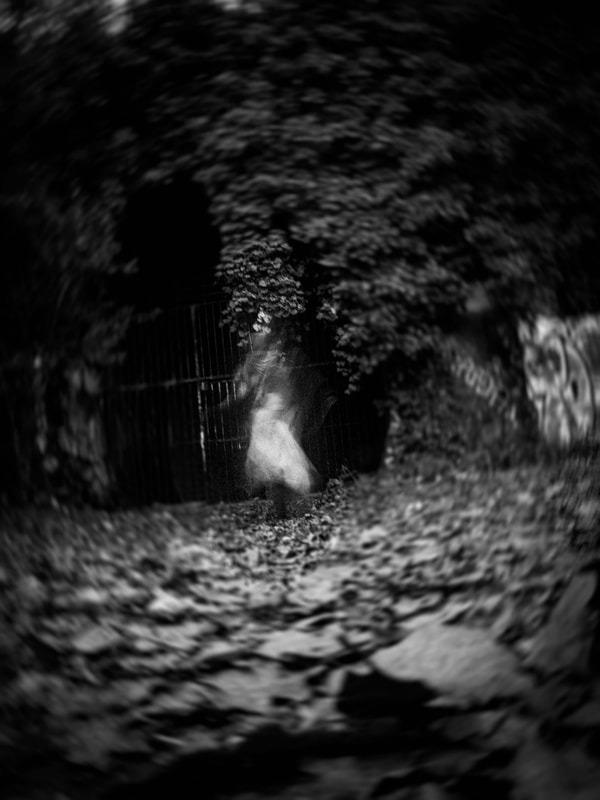
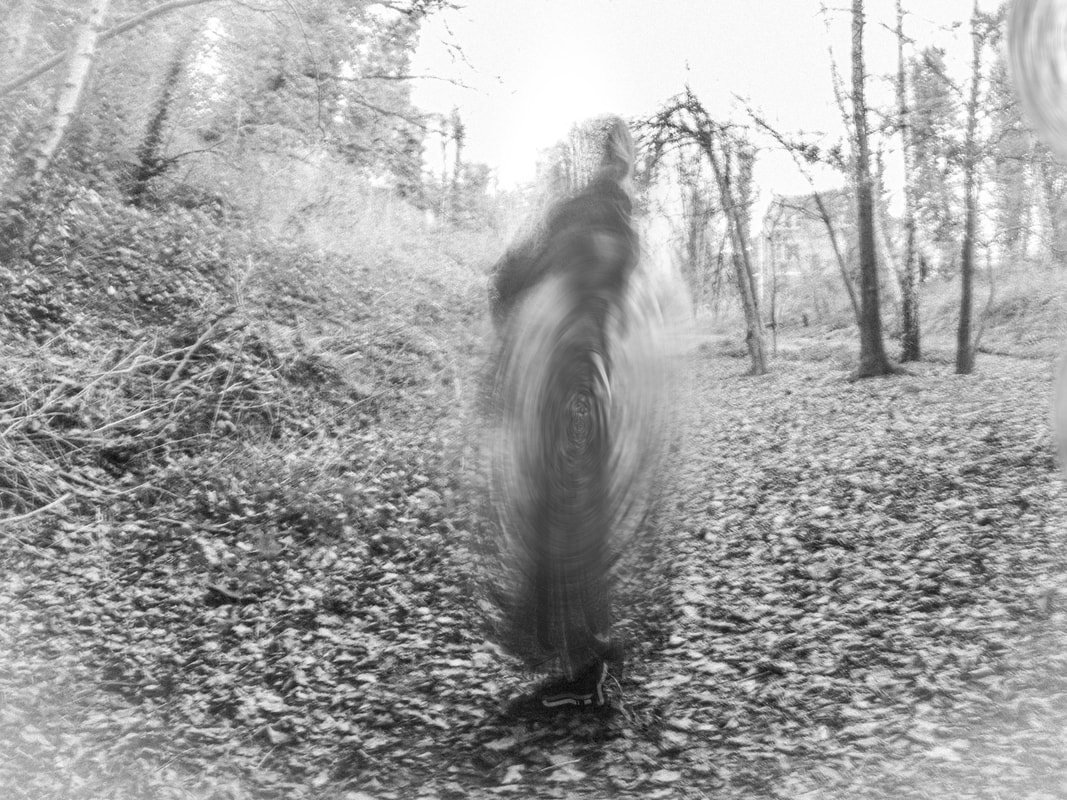
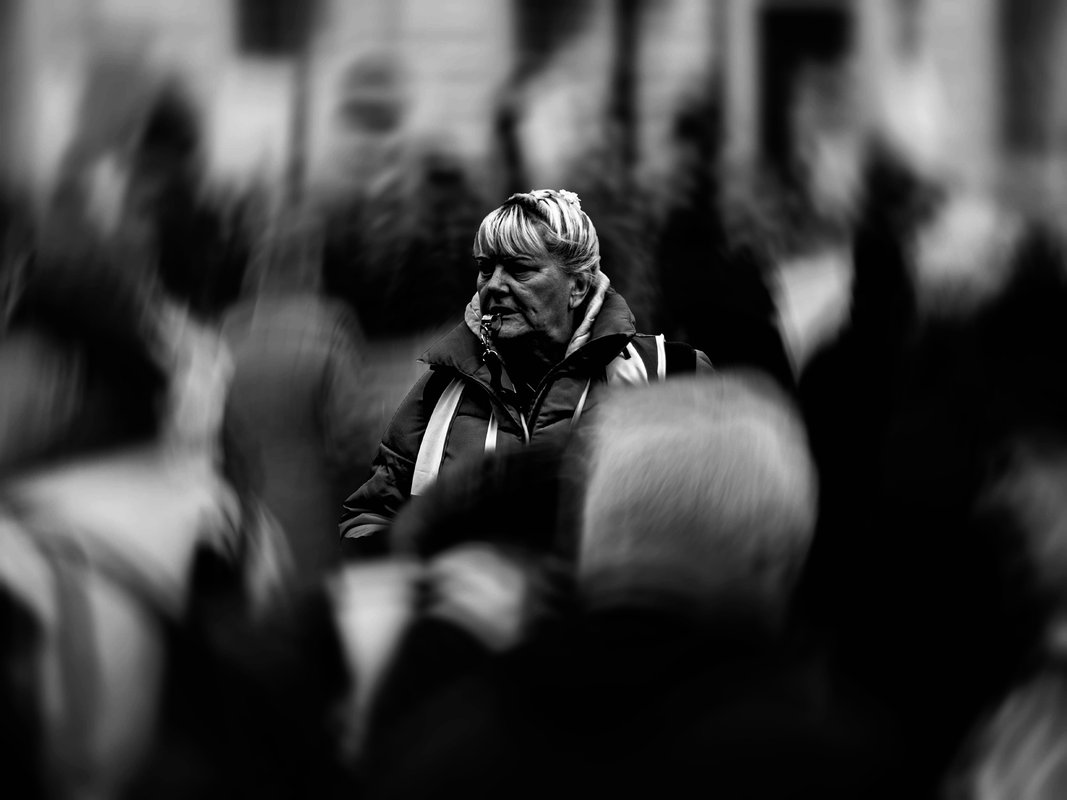
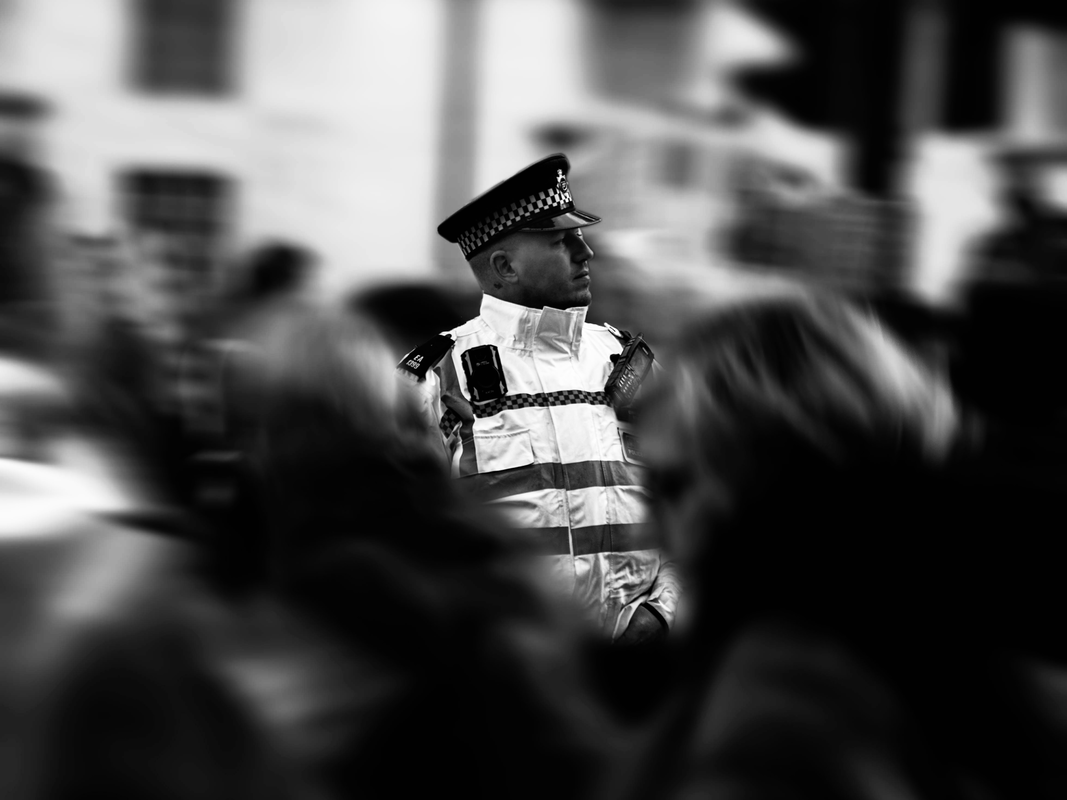
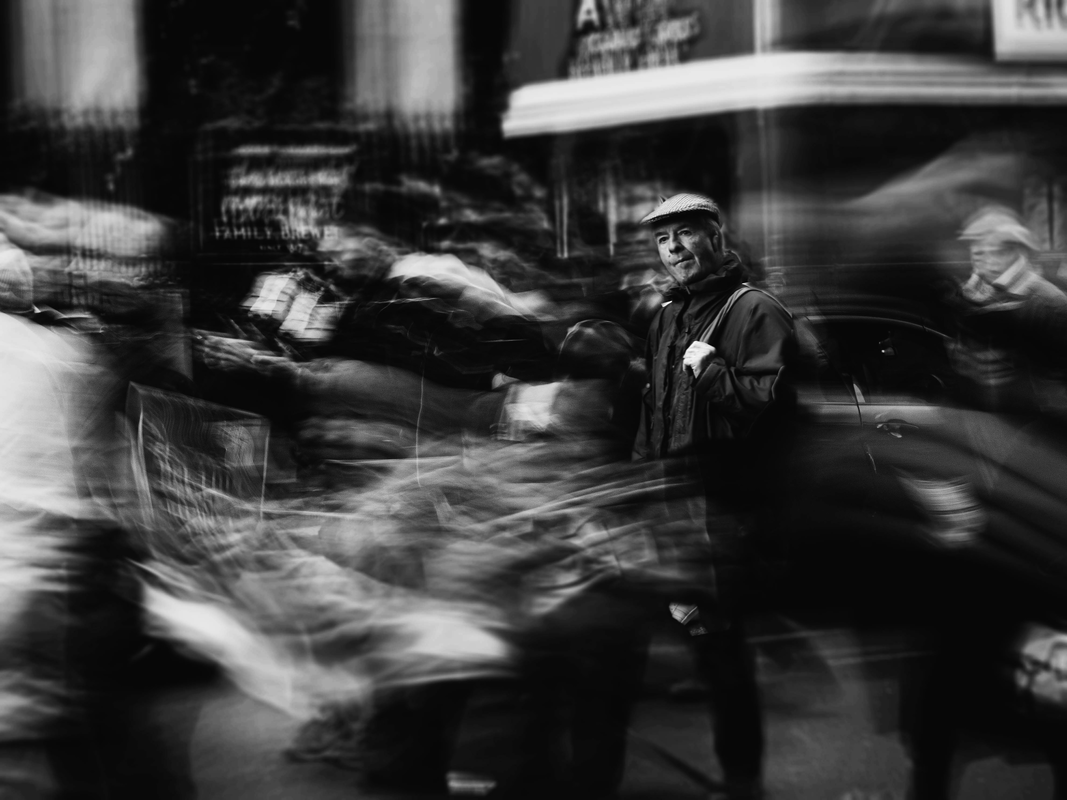
Asenjo uses these busy city and protest environments to create a chaotic atmosphere through his slow shutter speed images building these almost ghost like figures. He uses this human blur to draw attention to the subject within the frame and create a dynamic contrast between the two. The effect emulates this idea of freezing motion, slowing the fast movement of life down into a single frame possibly mocking society as we all walk through life at a fast pace not stopping to entertain the important things.
PERSONAL RESPONSE
PHOTO SHOOT
I decided to shoot in Central London around Leicester Square as on this particular day a number of public demonstrations were taking place.
For my camera settings I used a shutter speed of between 0.5 - 4, to combat the overexposure I increased my aperture to 22 and set my ISO to 100, making sure to use a tripod to keep my camera static and balanced. I also used the shutter priority mode (Tv) to gain a sharp focused image of a number of subjects to later composite into the low shutter images to fit with Asenjo's style.
For my camera settings I used a shutter speed of between 0.5 - 4, to combat the overexposure I increased my aperture to 22 and set my ISO to 100, making sure to use a tripod to keep my camera static and balanced. I also used the shutter priority mode (Tv) to gain a sharp focused image of a number of subjects to later composite into the low shutter images to fit with Asenjo's style.
EDITS
In photoshop I opened my low shutter speed photographs added a soft motion blur as well as decreased the texture and clarity values and added grain. I then paired up an image with a subject who I believed would fit well within the frame and masked around them using the pen tool. I increased the texture and sharpness of the subjects to further contrast the background.
For final touches I masked around a number of elements within the original low shutter image increased the feathering and ordered the layer ahead of the subject layer to create these foreground blurs living the photograph more depth building a more realistic eye catching image.
For final touches I masked around a number of elements within the original low shutter image increased the feathering and ordered the layer ahead of the subject layer to create these foreground blurs living the photograph more depth building a more realistic eye catching image.
|
|


For this image, I composited a reflection to act as puddle using clipping masks and a number of distortions and directional blurs.
EVALUATION
WWW
Compositing subjects from high shutter images into lows shutter images created an authentic effect drawing focus to the person in focus similar to that of Asenjo's work. The low shutter speed created a blur trail on any movement within the frame creating a ghost like effect matching to that of Eduardo's.
EBI
I used a polariser filter to reduce the spill of light from the sky which in this development overexposed many of my low shutter photographs leaving them unusable.
D E V E L O P M E N T 3
PINTREST INSPIRATION

|

|

|

|
ANALYSIS
The photographer uses a high contrast monochrome style to create mystery within their artwork. The bright whites and crushed blacks juxtapose one another producing a somewhat silhouette type subject within the frame.
I suspect to achieve this affect the photographer used a harsh light source causing heavy shadows to build across the face. In companion to this the strong and grungy grain manipulates the image making it seem as if it were a liquid bending across the frame building a unique composition.
I suspect to achieve this affect the photographer used a harsh light source causing heavy shadows to build across the face. In companion to this the strong and grungy grain manipulates the image making it seem as if it were a liquid bending across the frame building a unique composition.
PHOTOSHOOT
When photographing, I implemented a low shutter of 0.5 mixed with a higher shutter of 250, using a harsh light source from the left of the frame producing deep shadows across the face like the photographer, allowing my subject to bleed into the background.
I altered between a white and black backdrop to get a range of photographs with different looks and feels for further room to experiment when editing. I used a low aperture, to gain a soft depth of field blurring the imperfections of my backdrop to gain a softer block colour.
I altered between a white and black backdrop to get a range of photographs with different looks and feels for further room to experiment when editing. I used a low aperture, to gain a soft depth of field blurring the imperfections of my backdrop to gain a softer block colour.
EDITS
In Camera RAW, I crushed by blacks ands whites as-well as increasing the contrast. I increased the texture but decreased the clarity to gain detail within the face but achieve this ghost like effect. For particular photographs I added additional motion blur to enhance the low shutter effect. In addition, I used the smudge tool to create abstract trails off the images, I then used the rectangular marque tool to create a mask with heavy feathering to give the illusion that the trail isn slowly fading away.
I used additional images of my subject overlaying them onto the background with different blend modes to add texture into my images. Finally I rasterised all my layers and merged them before adding grain within the filter gallery to gain the grungy feel.
I used additional images of my subject overlaying them onto the background with different blend modes to add texture into my images. Finally I rasterised all my layers and merged them before adding grain within the filter gallery to gain the grungy feel.
|
|

EVALUATION
WWW
Low shutter speed in companion to additional motion blur and grain helped fit with the photographer style better. The heavy contrast developed the composition creating a ominous atmosphere.
EBI
Photographs were more texturised emulating that bending liquid effect of the photographers work better.
Low shutter speed in companion to additional motion blur and grain helped fit with the photographer style better. The heavy contrast developed the composition creating a ominous atmosphere.
EBI
Photographs were more texturised emulating that bending liquid effect of the photographers work better.
D E V E L O P M E N T 4
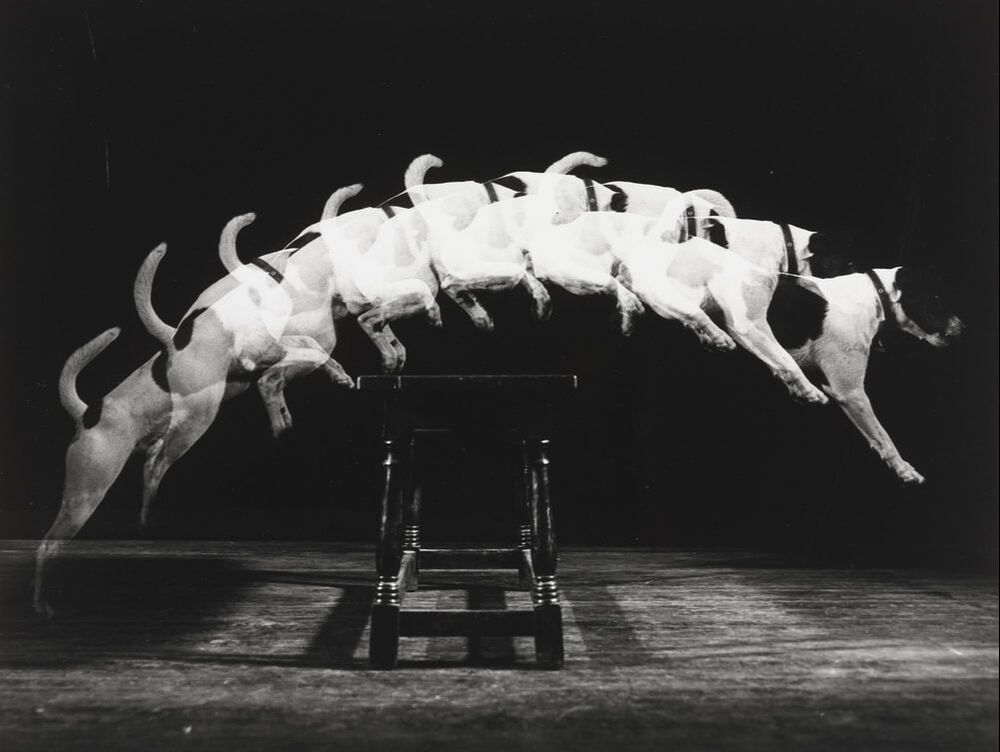
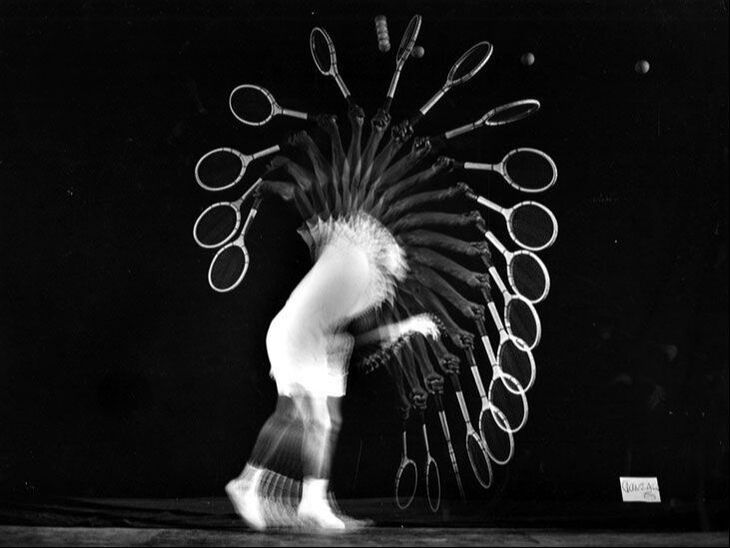
HAROLD EDGERTON
ABOUT
Harold Eugene "Doc" Edgerton, also known as Papa Flash, was an American scientist and researcher, a professor of electrical engineering at the Massachusetts Institute of Technology. He is largely credited with transforming the stroboscope from an obscure laboratory instrument into a common device.
|
|
ANALYSIS
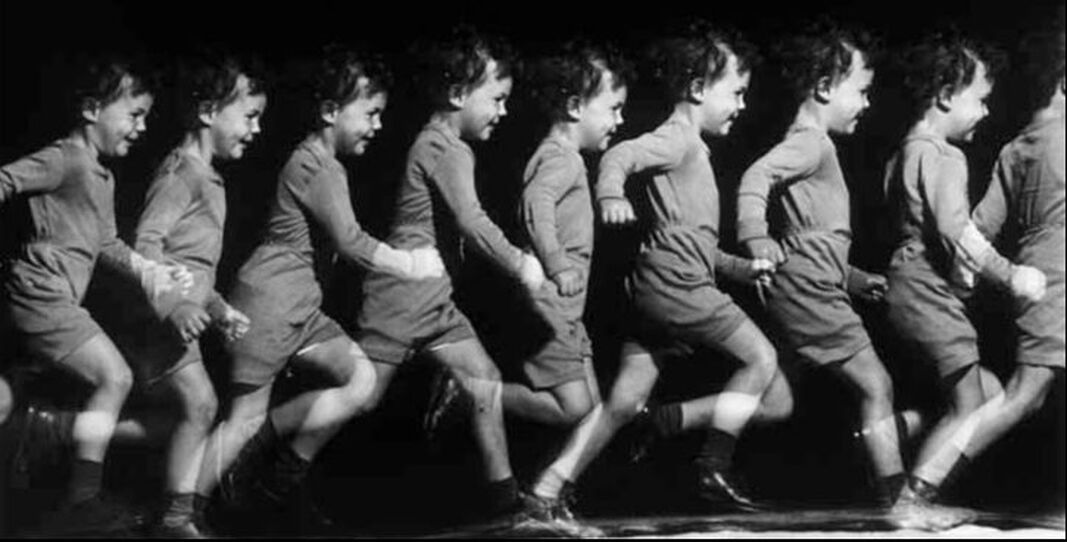
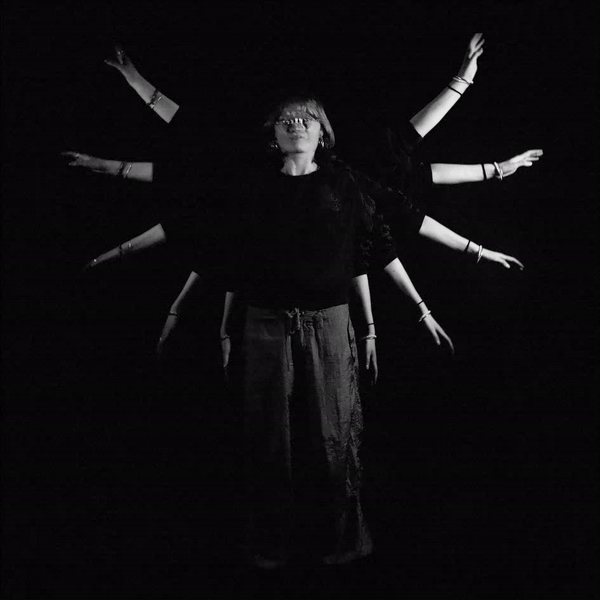
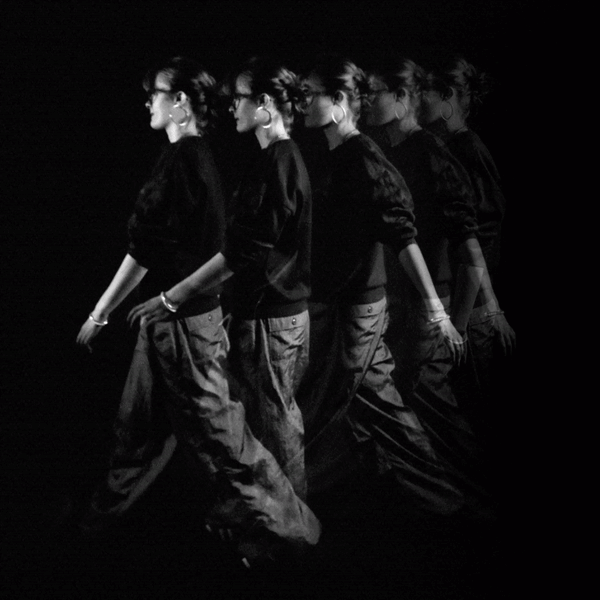
Edgerton uses a a fast shutter speed to capture the movement of different people and animals creating this almost moving image. His work highlights the change in motion and expression of his subjects creating this unique effect captivating the viewer attention. The progression of the frames builds a snapshot in time visualising movement as a static photograph. The combination of high contrast with a monochrome picture profile produces a timeless composition focusing in on the precision of the positioning of his subjects.
PERSONAL RESPONSE
PHOTOSHOOT
When photographing, I placed my subject in front of a solid black backdrop, to gain the simplistic look of Edgertons work focusing the viewers attention fully on the subject.
For lighting, I used two directional lights both at placed an 180 degree angle to my subject to get her evenly lit, while reducing shadow drop off onto the backdrop. To create a more complex and contrasting image, I reduced the intensity of one of my light sources to gain a exposure gradient across my subjects face.
I set my camera to the continuous shooting mode and set my shutter speed to around 250. I then held down my shutter as my subject performed a particular movement to gain an authentic look rather than have her stand in several positions attempting to fake the movement. This gave me a number of individual frames which I could later composite together to achieve a convincing composition.
EDITS
To begin with, I opened a number of photograph in photoshop and manual masked around my subject increasing the feathering by a hefty amount. I then created a new solid colour layer and set it to black. This process allowed me to achieve as pure of a black background as I possibly could while simultaneously removing impurities from my frame such as distractions around the outer frame.
I set the blend modes of my layers to lighten creating an overlay effect. I then re-positioned my layers slightly to build a cleaner composition. For finishing touches I rasterised my layers and merged them then added a filter gallery adjustment where I composited grain on top of my composition to blend the elements better. This in turn reduced the overall contrast of my image so I added a levels adjustment, crushing the blacks and highlights to gain a high contrast frame similar to that of Edgerton.
Building on from his work however I wanted to implement some kind of movement into my frame. I exported my images into Premiere Pro and added a directional blur effect, altering my key frames to produce a rotation animation where the blur fades in and spins out again. For my other GIF, I applied a cross fade between each frame to create a smoother animation.
|
|

EVALUATION
WWW
The use of continuous shooting mode created authentic movement, in addition to the strong lighting and harsh contrast I was able to effectively achieve Edgerton's unique style. The additional use of key frames added a kinetic layer of movement, developing Edgerton's static images in an intriguing manner emphasising the 'change' in motion.
EBI
Implement props into the composition allowing my subject to create a wider and more dynamic range of movements. Furthermore, Increasing the frame rate of my GIF's to gain smoother more visually pleasing animations.
D E V E L O P M E N T 5
JAKE WANGNER
ABOUT
American photographer and poet, primarily working with 35mm and 120 film. His work is best classified as abstract expressionism, and is inspired by artists like Mark Rothko, M.C. Escher, and James Turrell. His books are made with years of research, thought, and practice put into each concept. His photos have been licensed by musicians, magazines and museums around the world.


|

|
ANALYSIS
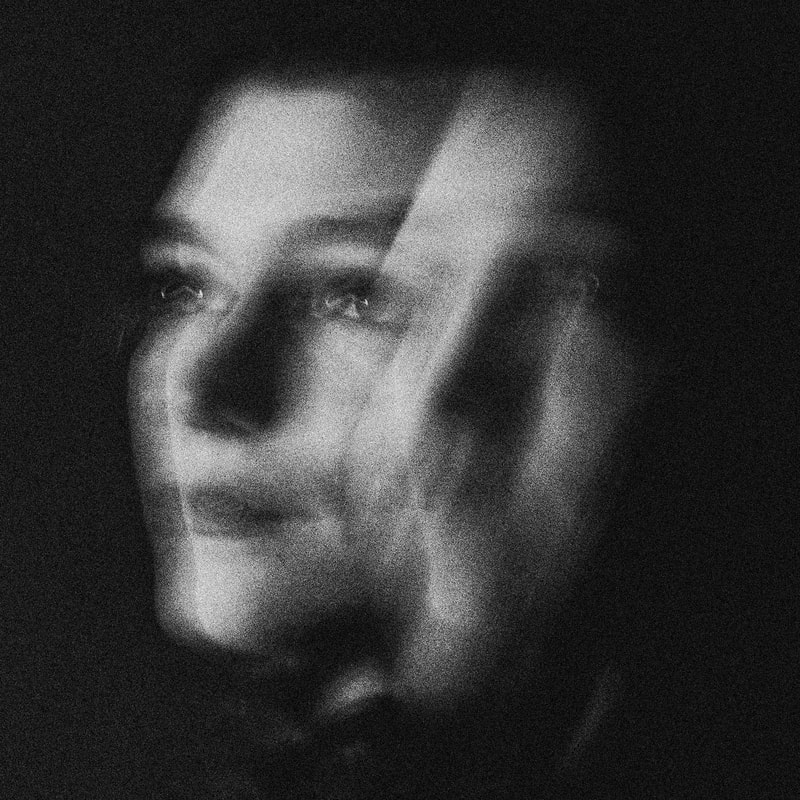
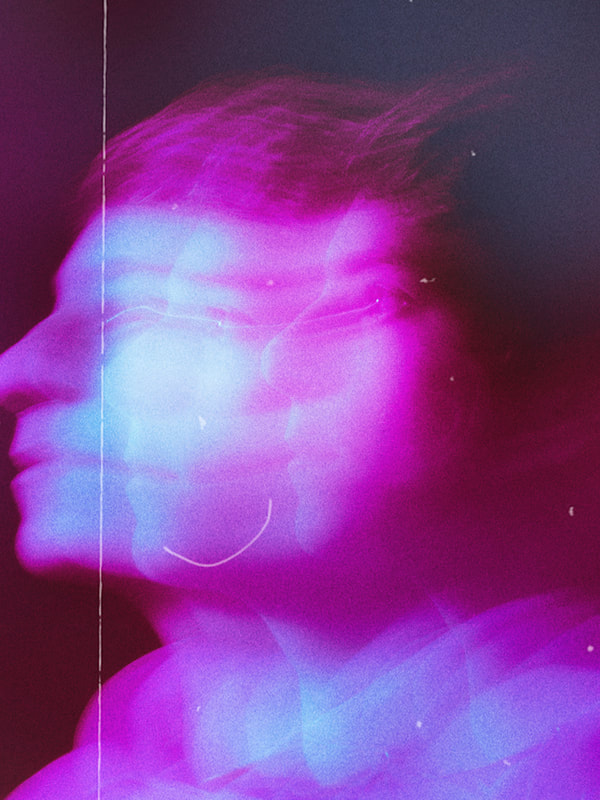
Wangner uses his grainy film style photographs to illustrate the blurry state and change of the human mind. His use of bright hues and over-saturated colours makes the images pop, intriguing the viewer. The rich contrast within his photographs creates a high dynamic range of exposure, using a directional light source from above the subject angled down creating a harsh shadow across the alternate side of the subjects face.
PERSONAL RESPONSE
PHOTOSHOOT
When shooting, to gain a blur, I used a shutter speed of 0.5 in addition to reposition my camera quickly in a direction of my choice after pressing the shutter allowing me to create these trails of light. I didn't have any coloured gels so instead used a white light source and altered by camera's white balance to 2500 kelvin, to gain a blue tint. I positioned my light source at a directional angle close to my subject to gain harsh lighting.
EDITS
In Camera Raw, I increased the contrast and texture values while dropping down the clarity by a large margin too gain additional detail in the face but still achieve soft glow from the lighting creating that sci-fi effect.
Inside Photoshop, I altered the hue and saturation to get a colour scheme of my liking, for some images using gradients mops with the overlay blend mode. I added additional grain, grunge, and dust & scratches overlays with a number of blend modes to gain Wangner's film look. To increase the highlights in particular areas I created a new layer and used the brush tool with a white colour - I then set this to the soft light blend mode.
Inside Photoshop, I altered the hue and saturation to get a colour scheme of my liking, for some images using gradients mops with the overlay blend mode. I added additional grain, grunge, and dust & scratches overlays with a number of blend modes to gain Wangner's film look. To increase the highlights in particular areas I created a new layer and used the brush tool with a white colour - I then set this to the soft light blend mode.

|
|


For this GIF, I exported a number of individual frames of the same image with different hue values. I then composited these together inside Premier Pro and added scale keyframes to gain a subtle zoom in and out. Finally, I implemented a dust & scratches overlay and set the blend mode to screen all the while reducing the opacity to around 60%.
EVALUATION
WWW
Slow shutter speed created unique and intriguing trails of light that fit well with Wangner's style. The large range of vibrant colours mixed with the grain overlays emulated a film stock, expressing the mood of the photographs further.
EBI
I used multiple light sources with different coloured gels to gain more interesting and complex compositions with a variation of different looks and feels.
D E V E L O P M E N T 6
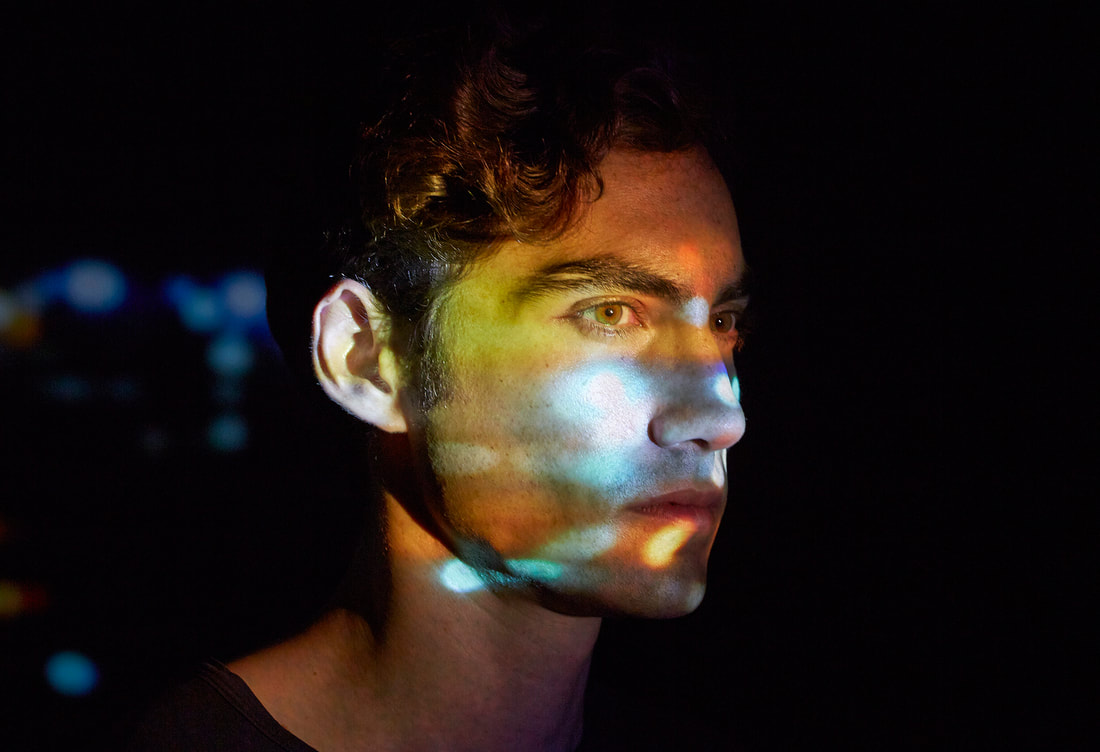
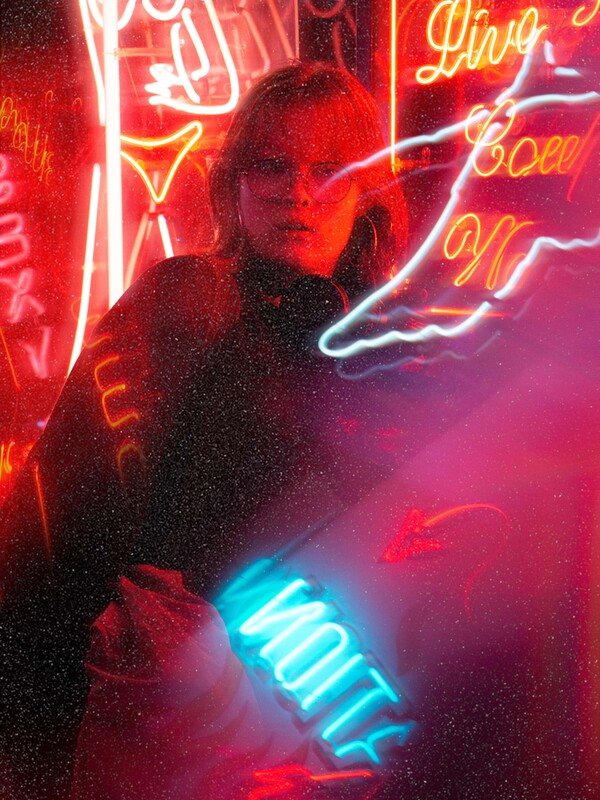
MADS PERCH
|
|
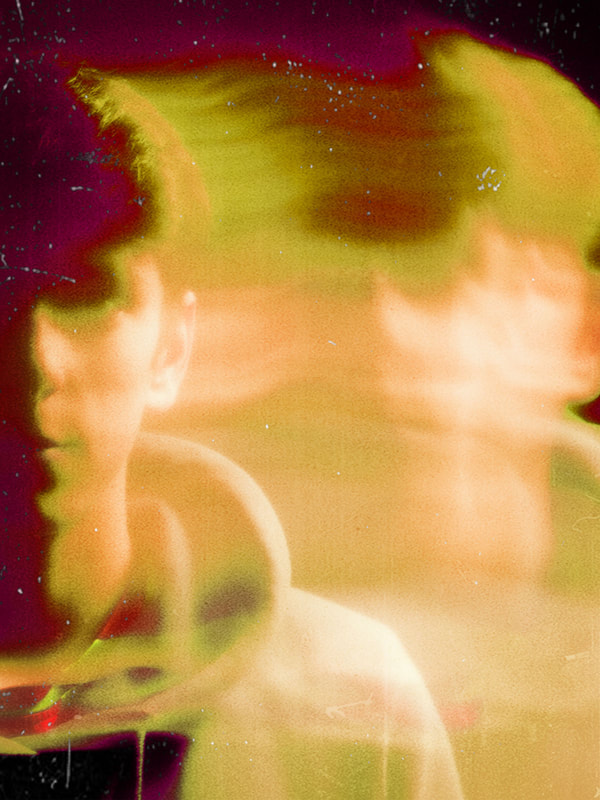
ANALYSIS
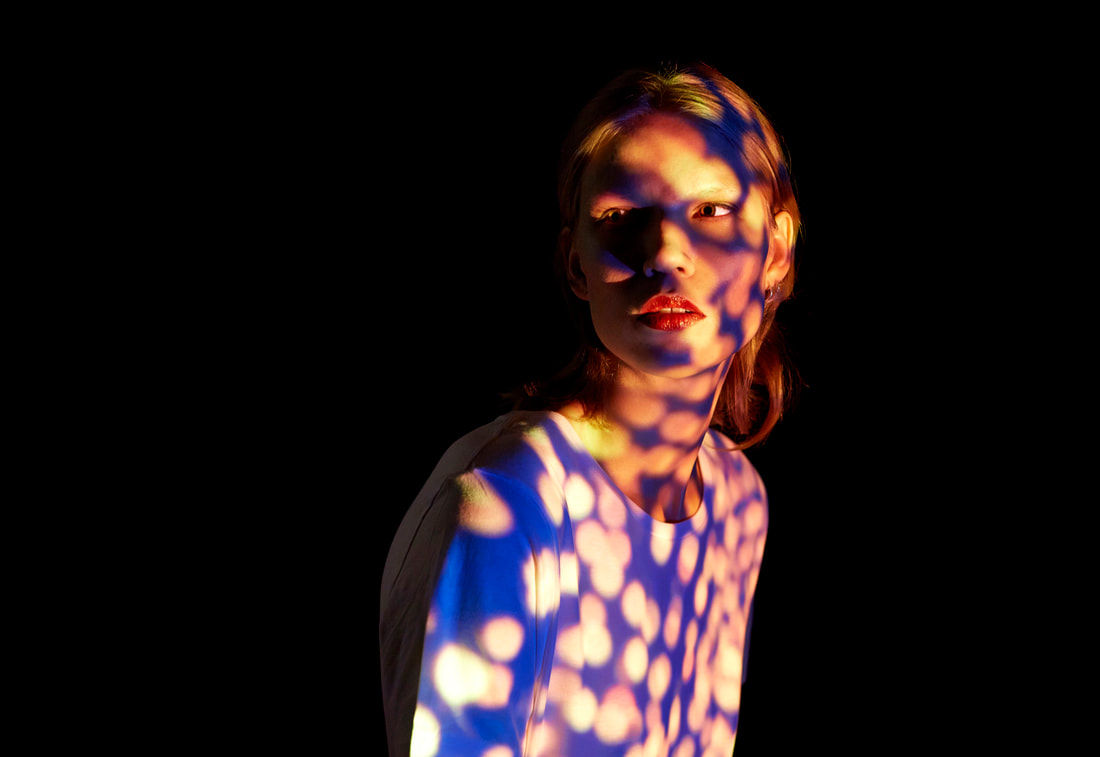
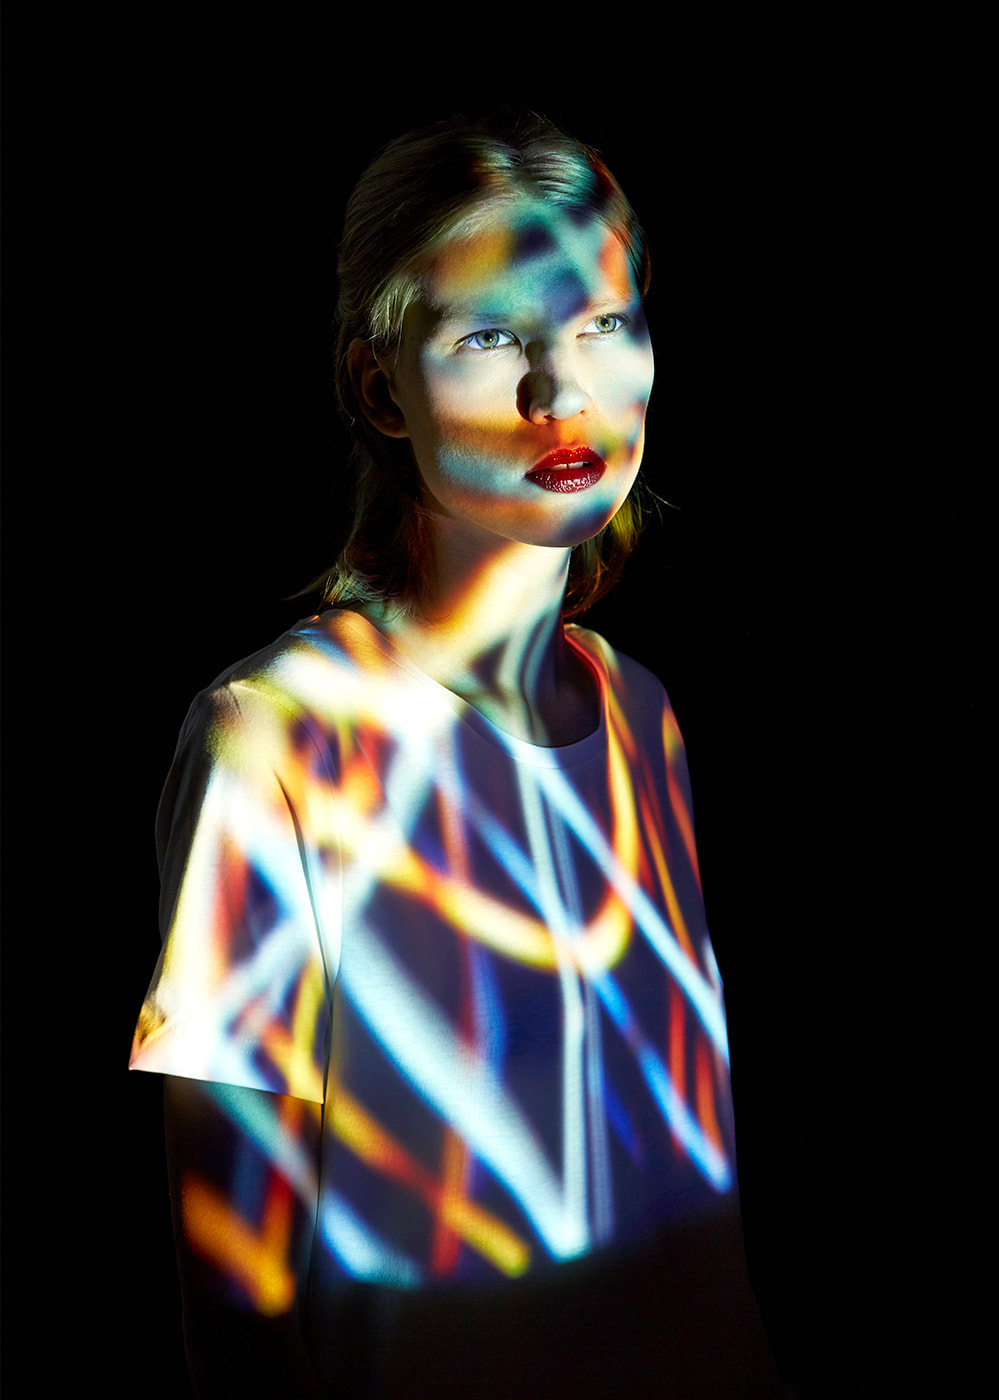
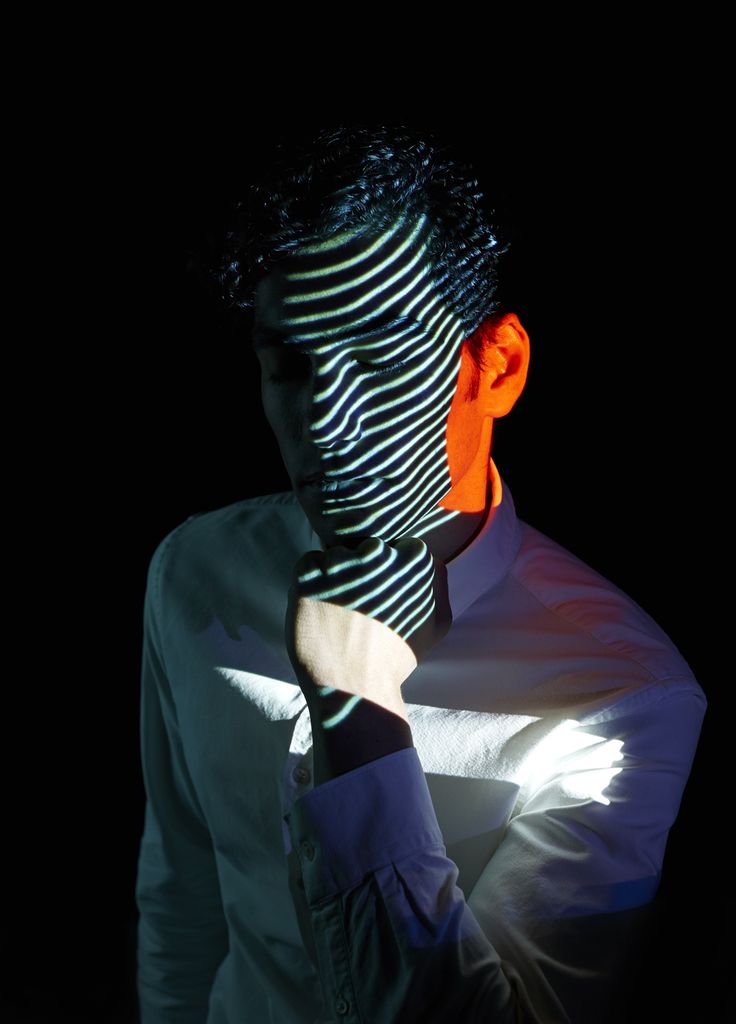
Perch uses projections to produce abstract overlays across her subjects. Perhaps the projections could reflect the inner emotion within the subject and the change of expression within their minds in a visual representation. Perch uses this dark environment using the projection as her single light source for effect, creating strong contrast.
I want to use this idea of projecting light onto my subject and develop the idea further by implementing a slow shutter speed effect, continuing with this grungy film style look like I did when responding to Wangner.
I want to use this idea of projecting light onto my subject and develop the idea further by implementing a slow shutter speed effect, continuing with this grungy film style look like I did when responding to Wangner.
PERSONAL RESPONSE
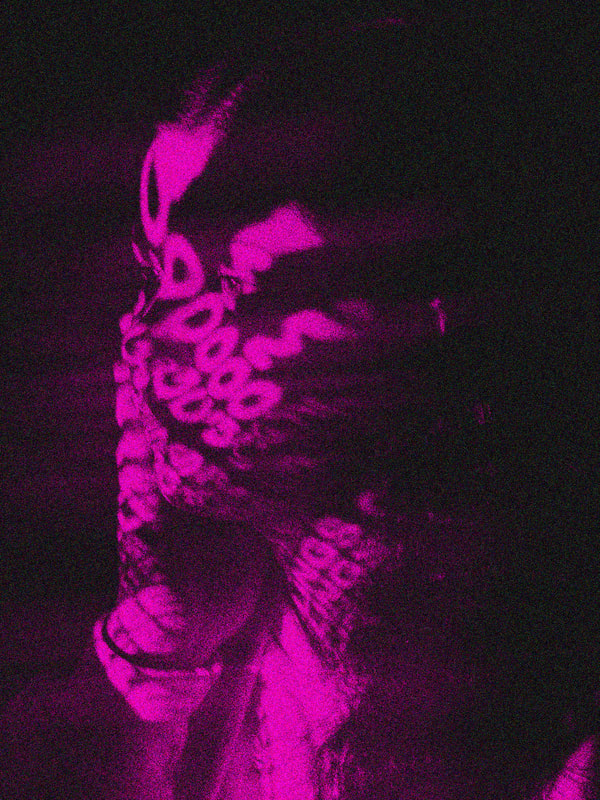
PHOTOSHOOT
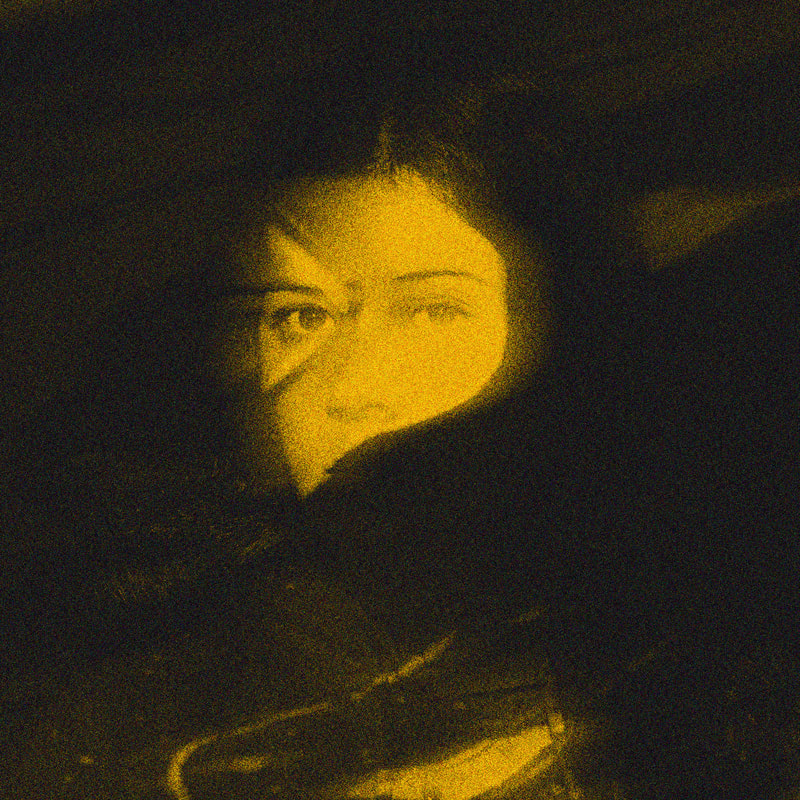
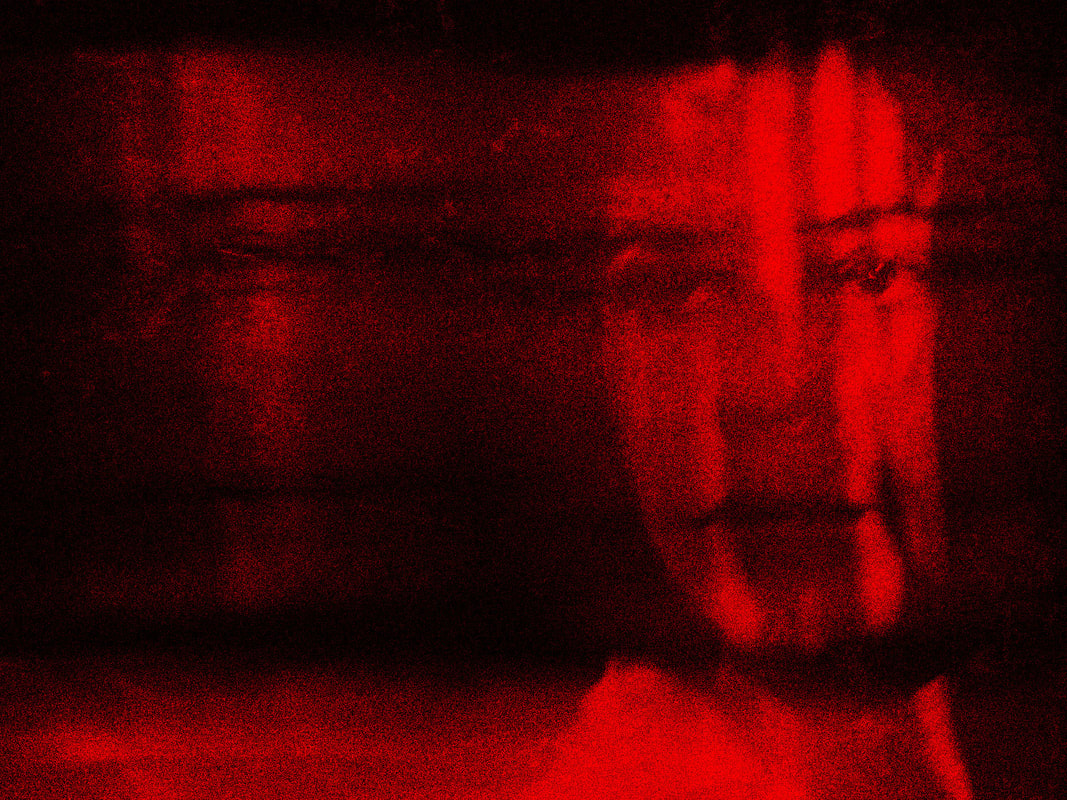
When photographing, I used a black backdrop and projected a number of words, shapes, and abstract compositions onto my subjects face. This effectively acted as my light source enscribing my subjects face with light creating a strong juxtaposition between the highlights and shadows. I then implimented a low iso to gain the crushed blacks I was aiming for.
I used a number of close-ups to highlight the emotion of my subject and pick up the attentitive detail within her expression to more accurately represent the change in her state of mind.
I used a number of close-ups to highlight the emotion of my subject and pick up the attentitive detail within her expression to more accurately represent the change in her state of mind.
EDITS
When editing, I opened my photographs in Camera RAW and set my saturation value to zero to gain a monochrome image. I rapidly increased the contrast and crushed my blacks. I then increased the texture and decreased the clarity to gain a soft glow. Next, I opened my images in a Photoshop document and added a solid colour adjustment layer setting the blend mode to multiply to give the image a colour.
For final touches, I used the filter gallery to add grain to my image, increasing the distortion values slightly. I then rasterised my layers and merged them. Then I duplicated the layer and added a motion blur adjustment and increased it by 50%. I then decreased the opacity of this layer and set the blend mode to lighten to enhance the glow of the light and gain an almost light streak across my subject.
For final touches, I used the filter gallery to add grain to my image, increasing the distortion values slightly. I then rasterised my layers and merged them. Then I duplicated the layer and added a motion blur adjustment and increased it by 50%. I then decreased the opacity of this layer and set the blend mode to lighten to enhance the glow of the light and gain an almost light streak across my subject.
|

|

|

|

EVALUATION
WWW:
Additional motion blur effectively created slow shutter speed effect depicting the change in motion and mentality of my subject. The vibrant colours accurately represented the emotions I wanted the images to covey.
EBI:
For additional visual intrigue - gradient overlay's could have been use to colour the images to gain a multitude of hues within a single frame, illustrating the change of colour representing emotion - more similar to Perch's style.
D E V E L O P M E N T 7
PINTREST INSPIRATION
|
|

|


|

|
ANALYSIS
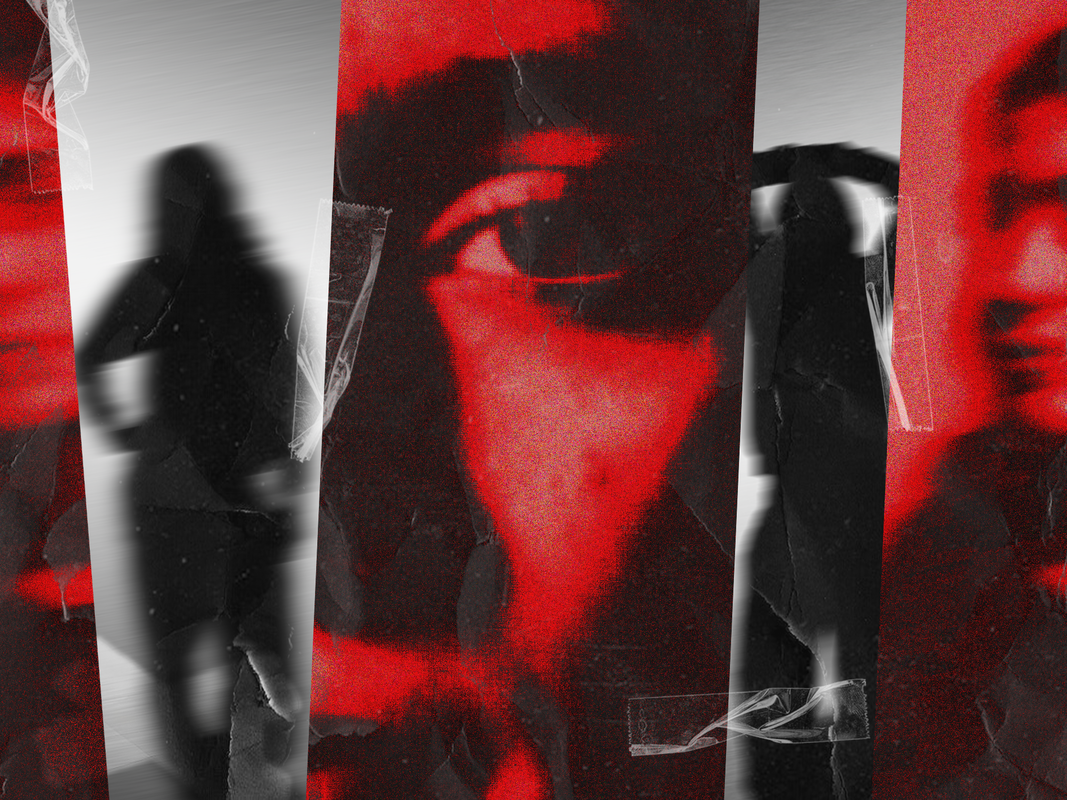
The photographers use a number of photographs within the same frame to produce an almost sequence like image, representing the change within the subjects expression. The deep red colour paired with the heavy contrast highlights the mysterious atmosphere present within the images. The use of subject silhouettes and extreme close ups allows the viewer to analyse the change between frames, building an emotional connection with the subject.
PERSONAL RESPONSE
PHOTOSHOOT
For the bulk of my photographs, I used a block white backdrop and positioned my light source - lighting the right side of my subject's face to gain contrast. I used a range of shutter speeds implimenting higher values of 200 to gain a clean and sharp image as well as values from 0.5 - 2 (asking my subject to move) for a selection of blurred photographs. I positioned my subject in a number of different poses expressing a number of different emotions and body languages for my medium close-up portrait shots.
For further layering in my edited composition later, I wanted to photograph the silloete of my subject. To achieve this I repositioned my light source behind my subject, using the backdrop as a bounce. This allowed me to reduce my iso to match the exposure of my backdrop leaving my subject in darkness, producing a strong silloehette.
For further layering in my edited composition later, I wanted to photograph the silloete of my subject. To achieve this I repositioned my light source behind my subject, using the backdrop as a bounce. This allowed me to reduce my iso to match the exposure of my backdrop leaving my subject in darkness, producing a strong silloehette.
EDITS
In Camera Raw, I heavily increased the contrast and highlights, crushing the blacks and shadows of my images, reducing the saturation to zero. I maximised my texture and clarity in companion to adding grain. In Photoshop, I masked around my subject using the pen tool increasing the feathering slightly.
|
|
For these photographs, I created a gradient layer and altered the colouring to my liking. I placed my subject layer above this, adding directional blur from the filters panel to gain this slow shutter speed effect.

For this image, I added a solid colour layer changing it to red. I used a number of paper rips and tear overlays. I used the same mask I used for my subject layer and applied it to the paper texture layer, increasing it's scale to give an outline to my subject. I then composited a close up of my subject, added motion blur and positioned it to the left of my frame.
I then composited a number of different photographs of my subject, masking around her distinct facial features. I added different paper textures and masked around the facial features to give them a border. I then repositioned them in random positions across my composition. For final touches I added a paper tear in-between my two subject images to create a more dynamic split. I added scotch tape overlays setting the blend mode to lighten, repositioning and scaling them across my canvas.
I then composited a number of different photographs of my subject, masking around her distinct facial features. I added different paper textures and masked around the facial features to give them a border. I then repositioned them in random positions across my composition. For final touches I added a paper tear in-between my two subject images to create a more dynamic split. I added scotch tape overlays setting the blend mode to lighten, repositioning and scaling them across my canvas.
Similar to my last edit, I composited three close ups of my subject and laid them out in a unique arrangement, altering the rotation and masking around sections of her face. I then added a red solid colour layer and set the blend mode to multiply to gain a strong red skin tone that contrasts the black shadows.
I composited my silhouette images onto a white and grey gradient to gain a cleaner looking background, I then added motion blur to gain a more mysterious looking figure. I placed these in the background allowing them to cut though into the final composition. Once again I added tape overlays as well as grunge and paper textures to increase realism and give a manual collage effect.
I composited my silhouette images onto a white and grey gradient to gain a cleaner looking background, I then added motion blur to gain a more mysterious looking figure. I placed these in the background allowing them to cut though into the final composition. Once again I added tape overlays as well as grunge and paper textures to increase realism and give a manual collage effect.

For this composition, I added my images to into a Kodak type frame putting my slow shutter speed images towards the bottom of the sheet to express the change and gradient in motion from the top to the bottom. I then added a red solid colour layer setting the blend mode to multiply.
For final touches on all my images, I rasterised my layers, merged them, then added grain from the filter gallery to blend all my elements better into a final composition, capturing the style of the photographer better.
For final touches on all my images, I rasterised my layers, merged them, then added grain from the filter gallery to blend all my elements better into a final composition, capturing the style of the photographer better.
EVALUATION
WWW
Textured overlays drastically changed the feel of the work from a digital edit to a more tangible collage fitting better with the style of the photographer. The development of implementing a slow shutter speed into the Kodak frame created a more visible effect of change within the subjects expression.
EBI
Practical camera overlays were used to create distortions and blurs such as the use of a prism.
D E V E L O P M E N T 8
19 TONES
|
|

ANALYSIS
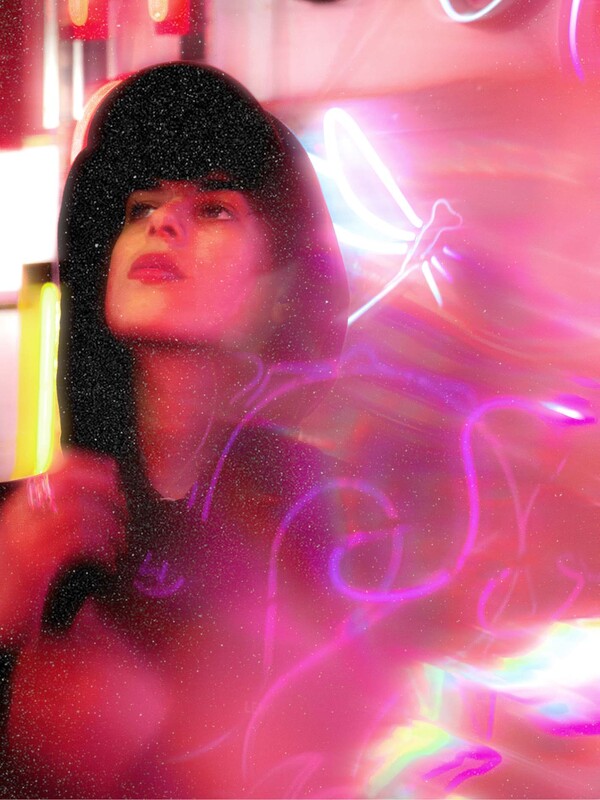
19 Tones refracts and bends light around his subjects to create a number of abstract almost anaglyph images, mirroring reflections from the surrounding environment.
The effect creates a chaotic whirlwind of hues, giving a feeling of movement to the frame with it's directional blurring and streaking similar to the effect a low shutter speed would achieve you. His work highlights the change in motion while simultaneously reflecting the subjects state of mind.
The effect creates a chaotic whirlwind of hues, giving a feeling of movement to the frame with it's directional blurring and streaking similar to the effect a low shutter speed would achieve you. His work highlights the change in motion while simultaneously reflecting the subjects state of mind.
PERSONAL RESPONSE
PHOTO SHOOT
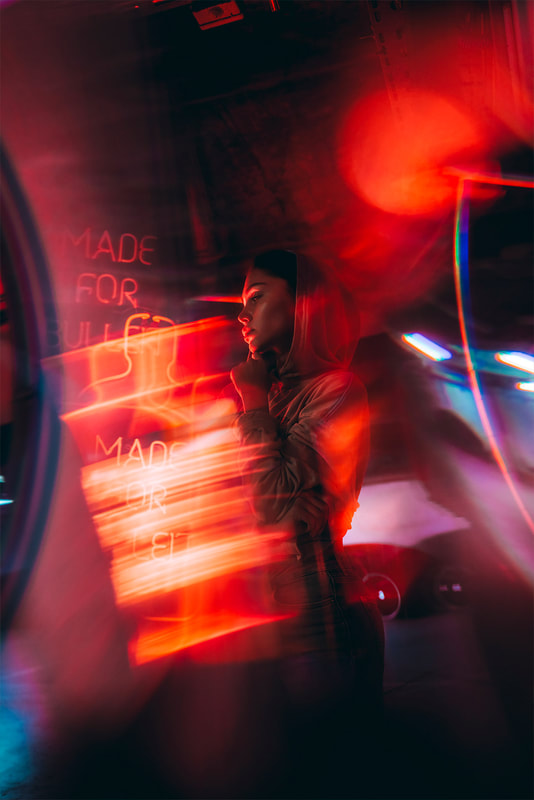
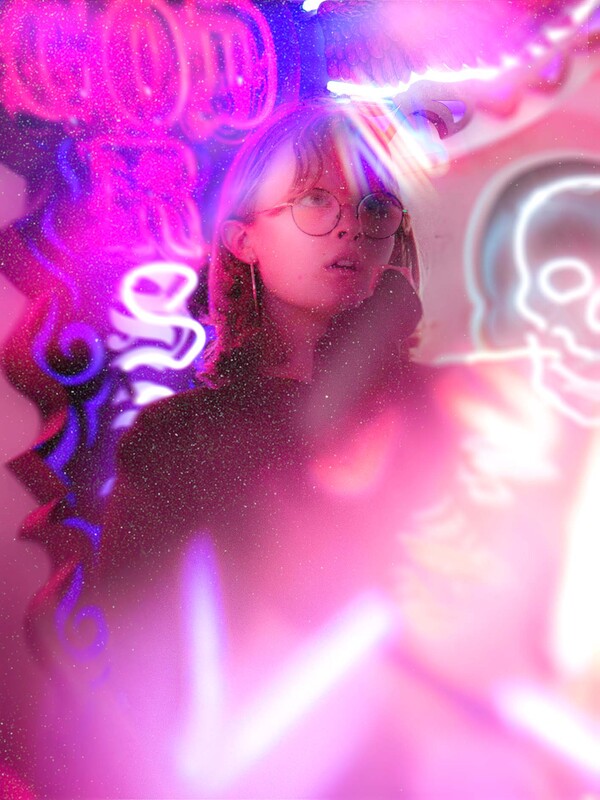
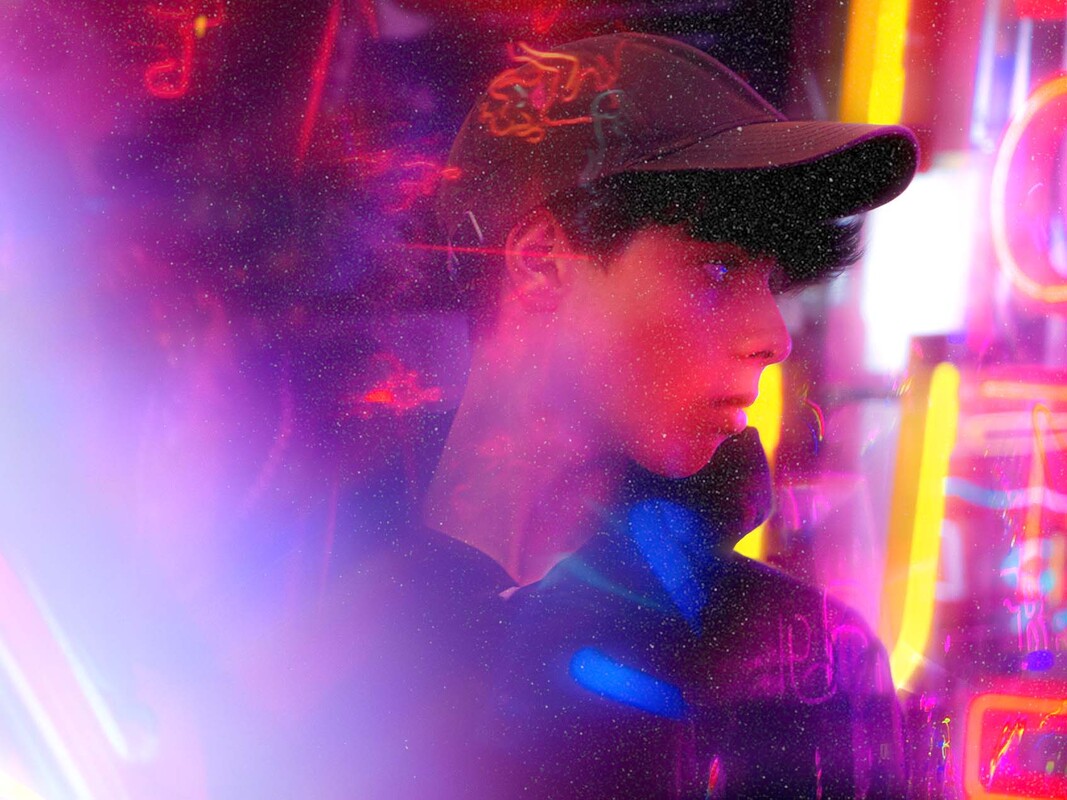
When photographing, I scouted for a location with many practical neon lights and signs to achieve the effect I was looking for. I placed my subject in a series of interesting locations making sure to surround her by a variation of unique background's with interesting shaped lights.
To fit the style of 19 Tones, I used a triangular light prism, refracting my light into interesting compositions. I used a variable zoom lens, keeping my focal length at about 118mm to gain a shallow depth of field in addition to creating more unique refractions from my prism as the higher zoom bent the light further.
For further flexibility when editing, I took a selection of photographs without my subject just capturing the refracted light through the prism. This allows me to overlay them on my original photographs later to get stronger reflections.
EDITS
I opened my photographs in Lightroom and began by increasing the contrast, lowering the shadows and increasing the highlights. I increased the texture to gain more detail within the frame, however subtly counteracted this by reducing the clarity to gain a soft glow from the light-source as well as these dream like skin tones.
In Photoshop, I overlayed my individual images of the lights and set the blend mode to screen, reducing the opacity. I then masked around suitable selections of the image with the pen tool, heavily increasing the feathering. I repositioned the new reflections in 'less busy' areas of the frame to create a more appealing composition.
In Photoshop, I overlayed my individual images of the lights and set the blend mode to screen, reducing the opacity. I then masked around suitable selections of the image with the pen tool, heavily increasing the feathering. I repositioned the new reflections in 'less busy' areas of the frame to create a more appealing composition.
|
|

|
|
EVALUATION
WWW
EBI
- Use of a prism allowed me to effectively refract my light sources creating soft distortions and blurs across the frame. In addition, the use of neon signs implemented a more chaotic feel to the composition reflecting my theme of 'change' further.
EBI
- A further variation of more colours of light were used to represent the emotion of my subject such as greens, yellows, and oranges
F I N A L P I E C E F I N A L P I E C E

F I N A L P I E C E F I N A L P I E C E
THE IDEA
For my final piece, I want to cultivate the themes, styles and techniques I have learnt and used across the course of this development process, harnessing the skills of photographers who I have researched (such as Francesca Woodman, Harold Edgerton and Eduard Asenjo) into a singular work representing and illustrating the physical and emotional state of 'change'.
To add a layer of complexion and to really get a sense of the 'change' I believe it is a necessity that my work use a form of stop motion, implementing video, utilising the motion of the frames to convey emotion to the viewer. I want to portray emotions of anger contrasted with happiness and express the rapid change of the human mind through a number of fast pace and quick cut transitions and distortions.
want to piece together a number of intriguing and experimental compositions in a textured and stylised manner, toying with a grungy monochrome look, stripping back the colour to purely allow the viewer to focus on the content of each frame. To produce these, I want to experiment with mixed media production, using a combination of practical and digital elements to produce a convincing final piece.
THE PROCESS
To begin with, I had to think up a number of different creative environments that represented 'change' in some form. I decided to use a singular subject to be the vehicle of emotional expression and came up with a number of compositional ideas that I then had to go about concocting how I would pull them off.
SLOW SHUTTER SPEED
Compositional Idea - I wanted to have my subject centre frame in a white abyss, surrounded by a number of slow shutter speed images (similar to Francesca Woodman) circling around her in a stop motion style, highlighting the change of motion, the slow shutter figure representing her state of mind - thoughts creeping up on her.
Photoshoot - For video, In camera, I used a monochrome picture profile and had my subject sat in front of a white backdrop. As my subject was quite close to the backdrop and I wanted to achieve the illusion that she is in a vaster white environment, I used two light sources each from either side of my subject eliminating the harsh shadow I was getting on the backdrop. To gain a softer shadow, however on the floor this time, I reduced the intensity of my light source on the left side of my subject allowing a shadow to cast as well as gaining some additional contrast on my subject.
I positioned my camera from a high angle using the makeshift set-up of a tripod on-top of a table to gain a wider perspective to match my edited composition later. I then directed my subject to sit patiently slowly moving her head around in different directions to gain a sense of motion as I recorded her.
To create a selection of low shutter speed photographs, I kept my camera in the same position but changed my shutter speed, lowering it to 1".5 and asked my subject to walk around where she was previously sat in a circle. This allowed me to gain a number of ghost like images to composite later.


Editing - In Premiere Pro, I opened my video of my subject sitting and drew a rough mask around her, increasing the feathering. I then added a new block colour below my layer and used the eyedropper tool to select the colour around the outer edge of my subject mask. This allowed me to gain a larger white backdrop giving me the flexibility to reduce the scale of my subject layer allowing her to appear smaller in the middle of the frame. I then screen shotted the frame.
In Photoshop, I opened my slow shutter images and masked around them, increasing the feathering to gain a blurred ghost like figure. I repositioned my images in a number of positions, exporting the frame at each position using an alpha background. Back in Premiere, I opened up my exported frames, reduced their timespan to about 3 frames, then re-ordered them. I copy and pasted these frames across the length of my clip to gain a repetitive animation.
For final touches I added a vignette onto and adjustment layer which added depth to the solid white backdrop, in addition to some subtle grain increasing the texture within the frames.


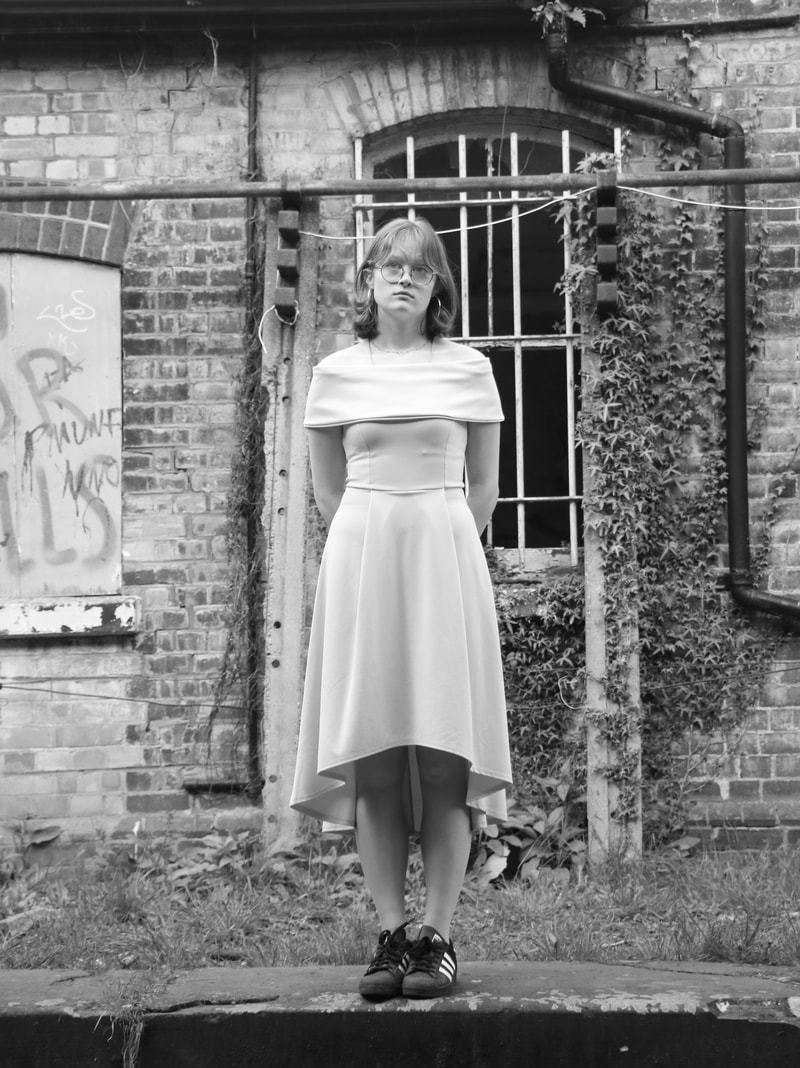
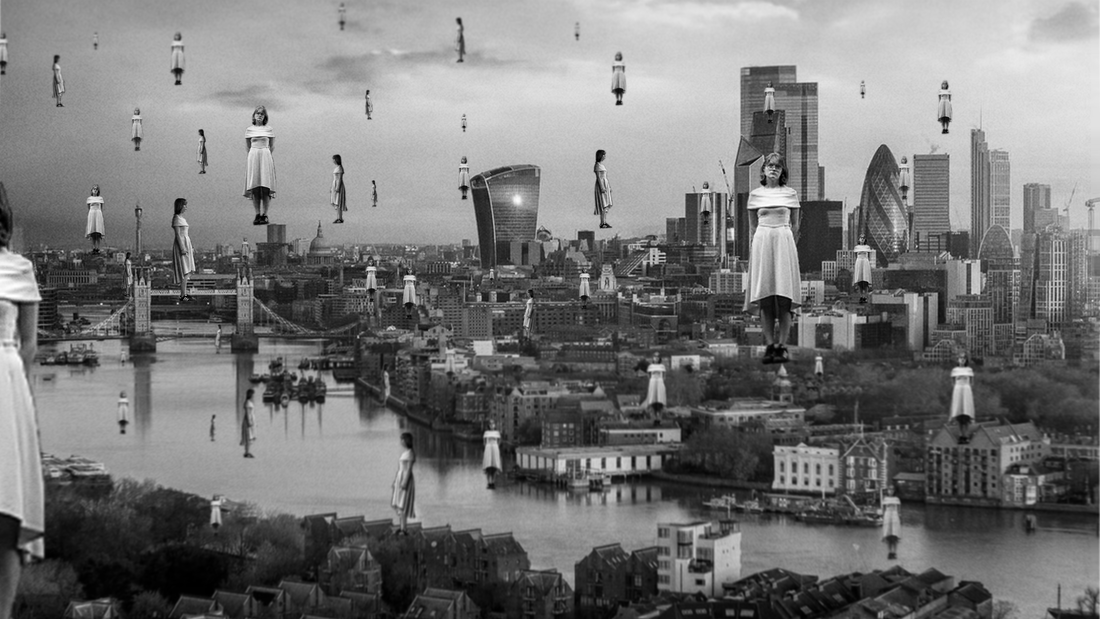
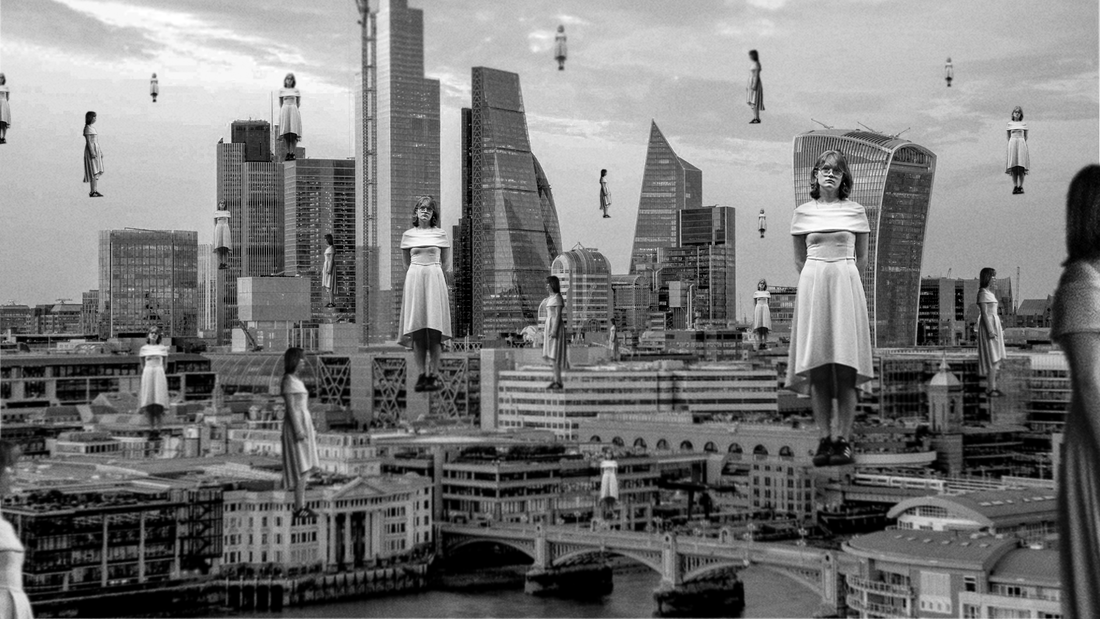
LONDON SKY
Compositional Idea - I wanted to fill a cityscape with a range of duplicated images (similar to Harold Edgerton's sequencing) of my subject from a range of angles creating an odd levitation effect.
Photoshoot - For this idea, I shot my subject using a monochrome picture profile, outside in natural lighting to gain a soft exposure across her figure. I used a similar perspective for each making sure to shoot side enough to fit her full body into the frame to aid the editing process later. I directed my subject to stand facing the lens but also to the side to gain different views of her figure.
Photoshoot - For this idea, I shot my subject using a monochrome picture profile, outside in natural lighting to gain a soft exposure across her figure. I used a similar perspective for each making sure to shoot side enough to fit her full body into the frame to aid the editing process later. I directed my subject to stand facing the lens but also to the side to gain different views of her figure.
|

|
Editing - In Photoshop, I masked around my subject using the pen tool not adjusting the feathering to gain a sharp mask. I opened up some photographs I had previously taken of the London skyline from a different project, repurposing them here. I duplicated my subject layers repositioning and resizing her in random positions across the cityscape to achieve a layered image. For additional depth, I added a tilt-shift adjustment increasing the distortion with a blur value of 3 pixels.
For final touches, back in Premier Pro I added an organic handheld motion by altering the position, scale, and rotation key frames to add motion to an otherwise static image.
For final touches, back in Premier Pro I added an organic handheld motion by altering the position, scale, and rotation key frames to add motion to an otherwise static image.
MOUNTAIN ON FIRE
Compositional Idea - I wanted to have my subject stranded at the peak of a mountain within a burning flame, to highlight how she feels isolated and is 'burning' with negative emotion.
Editing - I used the same photograph of my subject from my previous composition, already masked out. In Photoshop, I opened a large scale image of a mountain and decreased it's saturation value to zero, to match my monochrome subject layer. I repositioned and scaled my subject so she was standing on the peak of the mountain, I then exported this image.
In Premiere Pro, I composited a flame preset, setting it's blend mode to screen and repositioning it on top of my subject. For additional motion within the frame, I added a number of cloud and smoke overlays setting their blend modes to screen and decreasing their opacity by 40%.

NEWSPAPER STOP MOTION
Compositional Idea - I wanted to use grungy olden time newspaper style to create a stop motion sequence of my subject changing position and body language to highlight the 'change' in expression.
Photoshoot - I shot my subject on a white backdrop with a monochrome picture profile using a singular light source from the left of my subject. I got a number of medium close up shots, my subject with different body language and facial expressions.
Photoshoot - I shot my subject on a white backdrop with a monochrome picture profile using a singular light source from the left of my subject. I got a number of medium close up shots, my subject with different body language and facial expressions.
Editing - In Camera RAW, I opened my photographs and increased the texture and clarity as well as the contrast. I then exported and printing these portrait images. I also printed a number of news paper extracts. I cut out with scissors my subject from the background and placed her onto the newspaper repositioning her to create a unique composition. I then scanned these frames, and reopened them in photoshop to fix particular perspective issues.
In Premiere Pro, I shortened the length of my images to about 3 frames and built a stop motion sequence out of the newspaper and subject layers to create a choppy animation.
In Premiere Pro, I shortened the length of my images to about 3 frames and built a stop motion sequence out of the newspaper and subject layers to create a choppy animation.
CLOSE-UPS & SHARPS
Photoshoot - I wanted to create a selection of grungy videos in a super 8 style to highlight the change in motion of my subject. I varied between a white and black backdrop lighting my subject from the left. I use a number of close ups with a low aperture to achieve a shallow depth of field. I focused on parts of my subjects such as her eyes, hands, and jewellery etc.
*SNAPSHOTS FROM ORIGINAL UN-EDITED FOOTAGE*
Editing - In Premiere Pro, I added grain, dust & scratches, and distortion overlays set the blend modes to screen and soft. I also decreased the frame rate from 24 to 10 to gain a stutter between frames similar to a stop motion sequence.


*SNAPSHOTS FROM EDITED FOOTAGE*
AI ANIMATION
When attempting to edit my clips together I encountered a transitional error. My clips and images didn't feel as if they flowed as smoothly as they could and didn't create the abstract atmosphere I was aiming for effectively.
To counteract this issue, I turned to AI animation. I used ArtBreeder an automated AI art software to produce a distorted morphing animation out of my input images. I used a number of my images combined with other textures and elements to produce this animation.
After processing and rendering, I opened the animation in premier pro and resized it to fit my canvas. I then applied a a camera distortion effect usually used to correct anamorphic lens distortion however I set a key frame to decrease it's curvature to achieve this awkward bending effect.
*SNAPSHOTS FROM AI ANIMATION*
TEXTURES & OVERLAYS
For additional texture and complicity within my frames, I went about producing my own overlays. I wanted a number of abstract handwriting, lines and dots so I just simply used a black permanent marker on paper and created these abstract compositions. I then scanned them into Photoshop and altered the exposure and contrast to gain as pure of a white background as possible.
I used these within my compositions with the multiply blend mode to layer my backgrounds. In other instances I inverted the textures to gain white outlines for more variation.
I used these within my compositions with the multiply blend mode to layer my backgrounds. In other instances I inverted the textures to gain white outlines for more variation.
FINAL PIECE
EVALUATION
WWW
By using mixed media, I was able to effectively represent change through a number of different techniques and style choices. By using a video, the movement within the frames expresses the physical state of change of my subject and her narrative through life. This was enhanced through a selection of frames in my final piece where my subject rapidly ages from young to old, again highlighting the change. The use of overlaying video elements and piecing images together in a stop motion format created a chaotic atmosphere. This visual anarchy effectively mirrors my subjects state of mind and grief emoting these dark themes efficiently to the viewer.
EBI
My video sequence followed more of a structure building in tension and speed, effectively taking the viewer of a visual journey with both highs and lows and a fuller formed narrative, showcasing a wider range of themes in addition to using more unique environments to suggest 'change'.
